Windows Logon Agent (WLA)
Overview
This documents serves as a compliment to official product documentation and details deployment and configuration tasks relating to the Windows Login Agent (WLA). Specifically, this document outlines the various command line switches, their properties, values and descriptions for usage with either interactive, silent, local as well as remote installation.
Installation
Silent installation
One approach to controlling the choices made to the installer during installation is to run the installation silently with parameters. This allows the customer to set key configuration items such as authentication server FQDN and logon mode.
The following section provides an example of silent installation /quiet switch followed by product settings. A list of key product settings as well as useful generic MSI switches are then provided in the following tables.
Example of silent install for STA EU cloud that caches the Windows password and excludes administrators from the use of MFA:
msiexec /i <installerName>.msi /quiet
COMPANYNAME=swedemo TOKENVALIDATORLOCATION=cloud.eu.safenetid.com
USESSL=s USEFAILOVER=0 LOGONMODE=1 EXEMPTADMINS=1
Example of silent installation without forced reboot:
msiexec /i <installerName>.msi /quiet REBOOT=ReallySupress
Note
In the above examples the installation will run without the user noticing. If the /quiet switch is removed the installer will run in interactive mode, but with the applicable settings pre-populated.
WLA command line switches
The following table outlines WLA specific properties with possible values as well as their explanation (relating mostly to the GUI based options). The wording used here does not match the actual GUI options.
MSI switch/key |
Value(s) |
Explanation |
|---|---|---|
COMPANYNAME |
string |
Company name (any). |
TOKENVALIDATORLOCATION |
FQDN |
Defines primary authentication server |
TOKENVALIDATORLOCATION2 |
FQDN |
Defines secondary authentication server
Note: set the value to primary for STA
|
USEFAILOVER |
1 (0) |
1 = failover enabled
0 = no failover
Note: this option must be used with key
TOKENVALIDATORLOCATION2
|
USESSL |
s |
s = toggles use of SSL (requires certificates)
for primary server
|
USESSL2 |
s |
s = toggles use of SSL (requires certificates)
for secondary server
|
LOGONMODE |
1 (0) |
1 = Windows password is hidden (cached)
0 = Windows password and MFA is required
|
EXEMPTADMINS |
1 (0) |
1 = Exempts administrators from using MFA
0 = Everybody must use MFA
|
USEGRID |
1 (0) |
1 = GRIDSure is enabled
0 = GRIDSure is disabled
|
RDPWITHOUTOTP |
1 (0) |
1 = Allows outgoing RDP connection without OTP
0 = Outgoing RDP is subject to OTP
|
JSONFILEPATH |
string |
Path to file
|
Attention
Note that examining the MSI package with logging you will find additional keys/switches that are non-functional, possibly deprecated by Engineering. These include, but are not limited to EXEMPTADMINSCHECK, EXEMPTADMINSCHECK1, KEYFILEPATH, KEYFILE and USEGRIDCHECK.
Generic MSI command line switches
The following table outlines MSI switches that can be useful when installing WLA.
MSI switch/key |
Value(s) |
Explanation |
|---|---|---|
/i |
Basic install switch when run from command line |
|
/quiet |
Installs package in silent mode (e.g. in background) |
|
/passive |
Installer displays a progress bar to the user indicating
an ongoing (silent) installation
|
|
/log |
/L*V |
Creates an installation log file |
REBOOT |
ReallySupress |
By default when running in silent mode the computer will
automatically reboot on installation completion. To avoid
this behavior you can use REBOOT=ReallySupress instead.
In this case the installation will complete on the next
user initiated reboot
|
Interactive installation
For user controlled interactive installation, please refer to official product documentation.
Attention
Make sure you always install from the MSI package unless there is a real compelling reason to use the .exe file.
Group Policy based Configuration & Installation
The use of Microsoft Group Policy or Group Policy Objects (GPO) enables the SafeNet administrator to centrally manage the Windows Logon Agent (WLA) configuration for users and computers in an Active Directory environment. For more information about GPO, please refer to Group Policy Overview
Creating a Group Policy Object
An MSI package is deployed (distributed) through GPO. To create an object, you need to perform the below steps:
To open Group Policy Management, in the Run menu enter gpmc.msc and click OK
Expand Forest (your forest) –> Domains (your domain)
Right-click the Group Policy Objects and select New
Enter a name for your policy and leave Source Starter GPO as none
Right-click the domain name and select Link an Existing GPO…
In Select GPO pop up, select newly created GPO and click OK
Click the newly created GPO. In the right pane, right-click the linked domain name and select enforce
Note
Performing the above steps will create and enforce a new GPO, and will link it with the domain
Configuring ADMX and ADML Settings
The SafeNet Windows Logon Agent policy settings are stored in a Windows Administrative Template (ADMX) file. The settings can be edited using Windows tools. The settings can be propagated to the entire domain, or be applied to the local computer and domain controllers only.
To configure settings:
Add ADMX and ADML file to Group Policy Object (GPO) Editor
Configure ADMX and ADML settings using GPO Editor
Adding ADMX and ADML Files to Group Policy Object Editor
Copy the Local Group Policy definition (C:\Windows\PolicyDefinitions) to the Domain Group Policy location (C:\Windows\SYSVOL\sysvol\<domain_name>\Policies).
Copy the ADMX file (
<Application_name>_AgentConfig_<Date>.admx) from Agent Installation Package, to the following location on your domain controller/server:C:\Windows\SYSVOL\sysvol\<domain_name>\Policies\PolicyDefinitions
Copy the appropriate ADML language file (
<Application_name>_AgentConfig_<Date>.adml) to the language folder in the\PolicyDefinitionsfolders.
For example:
In Windows 8/10, the English language file provided should be copied to:
C:\Windows\SYSVOL\sysvol\<domain_name>\Policies\PolicyDefinitions\en-US
Configuring ADMX and ADML Settings
After the Administrative Template has been added, you can open the template to configure the settings
To open the SafeNet Windows Logon Agent settings:
Open the Windows Run menu and type in
gpmc.mscClick OK
The Group Policy Management windows opens

Figure: Determining target scope of policy. Complete one of the following actions:
Right-click Default Domain Policy or newly created GPO under the domain node.
Navigate to the Domain Controllers node and right-click Default Domain Controllers Policy
From the dropdown menu, select Edit…. The Group Policy Management Editor window opens
In the left pane, navigate to . The SafeNet Windows Logon Agent settings are displayed in the right pane:

Figure: WLA policy settings via GPO. Enable all the required settings (except PrimaryServiceURL and OptionalSecondaryServiceURL), if not already enabled, with default value or user-defined value
Enable all the required settings (except PrimaryServiceURL and OptionalSecondaryServiceURL), if not already enabled, with default value or user-defined value
Important
The PrimaryServiceURL and OptionalSecondaryServiceURL should be set to [Not Configured]. The value of both the settings gets configured via the .agent file
Note
For LocalUserOrGroup_Ex and LocalUserOrGroup_In settings, in the Value field, you can enter %COMPUTERNAME%groupname. In this case, when the GPO settings are pushed to the client machines, the variable (%COMPUTERNAME%) will be automatically set to the computer name of the respective client machine
ADMX and ADML Settings
The table below provides description of the GPO Settings available with the SafeNet Windows Logon Agent:
Setting |
Description and Usage |
|---|---|
Use Proxy |
This policy setting configures the use of a proxy server for
connecting with the token validation service e.g. STA or a Token Validation Proxy.
The setting corresponds to the UI option (Communications tab) called
Use Proxy.
[1] Enables the use of a proxy server
[0] Proxy server is not used (default value)
NOTE:
If you enable this setting you must also enable ‘Proxy Server’
|
DoNotFilter |
This policy setting allows a view where other, third-party credential providers
can also be displayed
By default, WLA filters out (does not display) any other credential providers.
The correct syntax is:
{GUID},{GUID},{GUID}
|
Strip NETBIOS prefix
(domain\username will be sent as username)
|
This policy setting determines if a NETBIOS name (DOMAIN\USERNAME) is
sent to the authentication server as-is, or if the portion prefixing
the username is removed (stripped).
The setting corresponds to the UI option (Communications tab) called
Strip NETBIOS prefix (domain\username will be sent as username)
[1] Strips the DOMAINportion from the username when authenticating with SAS
[0] WLA will not sanitize the username (default value)
NOTE:
This is useful when users log in with NETBIOS sometimes and SAS
username at other times and you need to sanitize what is being sent from
different protected resources so that SAS can still authenticate the
user(s) consistently.
|
WLAasV1Provider |
WLAasV1Provider is used to select the Credential Provider Type
and specify whether Credential Provider Type is set to V1 or not.
- Windows Credential Provider Type selected as V2: WLAasV1Provider=0
- Windows Credential Provider Type selected as V1: WLAasV1Provider=1
In Windows 7 and Windows Server 2008 R2,
it is recommended to keep the value 1 i.e. using V1 credential provider.
In Windows 8, 10, 2012, 2016, 2019,
it is recommended to keep the value 0 i.e. using V2 credential provider.
|
IPAddressAPIUrl |
This specifies the URL to get the public IP of the machine,
to support network/IP based logon policies as configured in STA
|
IPAddressFallbackAPIUrl |
This specifies a secondary URL, in case the URL mentioned in
IPAddressAPIUrl fails, to get the public IP of the machine to support
network/IP based logon policies as configured in STA
|
Enable SSL Certificate Check |
This policy setting enables or disables the validation of the SAS or Token Validation Proxy (if used) server certificate.
The setting corresponds with the UI option called Enable SSL Certificate Check.
[1] WLA will validate the server certificate (default value)
[0] Does not validate server certificate
NOTE:
Disabling the certificate check can be useful in troubleshooting or when testing using a self-signed untrusted certificate.
|
Proxy Server |
This policy setting configures the proxy server IP address or FQDN
and its port number for use when connecting with the token validation
service (e.g. SAS or a Token Validation Proxy).
The values set correspond to the UI options (Communications tab) called
‘Proxy Server:’ and ‘Port:’. Correct syntax is: ‘1.2.3.4:567’ or
‘host.domain.name:port’.
NOTE:
Must be used with setting ‘Use Proxy’ and/or ‘Use Proxy for SPS’.
|
Exempt Local/Domain Administrator strong authentication |
This policy setting configures the exclusion of local and domain
administrators from using strong authentication (OTP). When set,
administrators can authenticate with fixed passwords instead of dynamic
passwords. When disabled [0] all users must use OTP for Windows Logon
(assuming no other exemptions are configured). The setting corresponds
to UI option: ‘Exempt Local/Domain Administrator strong authentication’ (Policy tab)
[1] Local & Domain Administrators are exempt from strong authentication (default value)
[0] All users musts use strong authentication.
|
ProxyPassword |
This policy setting configures the proxy server password as used when
authenticating to the defined proxy server (if required), in order to
connect with the token validation service (e.g. SAS or a Token Validator
Proxy host). The setting corresponds to the UI option called:
‘Password’. Note that setting ‘Password’ also assumes setting ‘Proxy
Server’ and ‘Username’, and may also require setting ‘Use Proxy for SPS’
(if applicable)
WARNING:
Windows Logon Agent (WLA) uses the SAS key file to encrypt and decrypt
the proxy password during operation and thus assumes the password is
propagated from the GPO in encrypted form (!) To set the password with
the GPO it is therefore best to retrieve it from the registry of a
client already installed
|
LocalUserOrGroup_Ex |
Local Groups which are excluded from SafeNet Authentication.
NOTE:
When any group is added to this setting through GPO,
DomainUSerOrGroup_In has to be set to ‘*’
|
Primary Server (IP:Port) |
This policy setting configures the primary SAS authentication server (or
the Token Validation Proxy). Syntax is either protocol followed by IP
address and port (if non-standard) or protocol followed by FQDN and port
(if non-standard), i.e.: ‘http://1.2.3.4:8080’ or
‘https://server.domain.com’. The setting corresponds to UI options
(Communications tab): ‘Primary Server (IP:Port)’ and when the default
value is used (or when a custom value is used with https): ‘Use SSL’
|
Enable Microsoft Password Caching |
When enabled (set to 1), the WLA will cache the user’s domain password on first
successful authentication and then cache it until password expiration,
requiring only the use of OTP for Windows logon
The setting corresponds to the UI option called: ‘Enable Microsoft Password Caching’
[1] WLA will cache the users Windows domain password and only require OTP
[0] Users are required to enter both Windows domain password and OTP (default value)
NOTE:
Enabling this setting will improve usability (user convenience) of the solution
|
Agent Encryption Key File |
This policy setting sets the key file location. Refer to default value below for example syntax
The setting corresponds to the UI option called: ‘Agent Encryption Key File:’ (Communications tab)
Default value: [C:Program FilesSafeNetWindows LogonKeyFileAgent.bsidkey]
NOTE:
A customer may use the default (bundled with the agent) key file or set their own virtual server specific key file
|
Enable GrIDsure tokens |
This policy setting configures the appearance and use of GrIDsure authentication in WLA during Windows logon.
The setting corresponds to the UI option (Policy tab) called: ‘Enable GrIDsure tokens’.
[1] Enables GrIDsure authentication in WLA (default value)
[0] Disables the use of GrIDsure authentication
NOTE:
Only leave this setting enabled if you need to support GrIDsure.
|
WrapCredentialProvider |
This entry specifies the GUID of the credential provider the agent is wrapping to provide two-factor authentication.
This setting corresponds to the UI option under Credential Provider (Policy Tab)
It could be set to either
Windows v1 Password Credential Provider - {6f45dc1e-5384-457a-bc13-2cd81b0d28ed}
or
Windows v2 Password Credential Provider - {60b78e88-ead8-445c-9cfd-0b87f74ea6cd}
NOTE:
It can be set to wrap some other 3rd party credential provider by
selecting “Other credential Provider” and specifying its GUID
Correct syntax is:
{GUID}
|
Logging Level |
This policy setting configures client side log level. The setting
corresponds to the UI option called: ‘Logging Level’ (Logging tab).
[1] Critical
[2] Error
[3] Warning (default value)
[4] Info
[5] Debug
|
Attempt to return to primary Authentication Server every: [ ] minute(s) |
This policy setting configures the time, in minutes, after which the
WLA will attempt to return to its primary authentication server
following a failover to a defined secondary server.
The setting corresponds to the UI option called: ‘Attempt to return to
primary Authentication Server every [ ] minute(s)’ (Communications tab).
The default value for this setting is 10 minutes.
NOTE:
This setting is only applicable if a failover server has been defined using the setting ‘Failover Server (optional)’
|
Allow outgoing RDP connection without OTP |
This policy setting configures if WLA should be used for outgoing RDP
(remote desktop). The setting corresponds to the UI option called:
‘Allow outgoing RDP connection without OTP’.
[1] WLA is not enforced for outgoing RDP (default value)
[0] Outgoing RDP is subject to the use of OTP
|
DomainUserOrGroup_In |
This policy setting configures what users are subject to using strong
authentication (OTP).
When a group is added to DomainUseOrGroup_In (Only selected group must
use SafeNet), then the LocalUserOrGroup_Ex is set to ‘*’. If pushing
through GPO, the user needs to set the registry entry to ‘*’
[ ] Not configured
[DomainName.com\Group Name] Only the provided group must use strong authentication
[*] All users must use strong authentication (sets UI option: ‘Everyone must use SafeNet’)
NOTE:
If you define a group or multiple groups in this setting you must also
set DomainUserOrGroup_Ex with a value of ‘*’, meaning all but the
defined groups of users are excluded from strong authentication
|
Allow windows explorer without OTP |
This policy setting configures if WLA should be used for accessing network resources using Windows Explorer
The setting corresponds to the UI option called: ‘Allow windows explorer without OTP’ (Policy tab)
[1] WLA is not enforced for outgoing Windows Explorer
[0] Outgoing Windows Explorer is subject to OTP (default value)
|
Credential Tile Filter |
This policy setting configures the appearance of credential provider tiles during Windows Logon
[0] All credential tiles presented to the user will enforce SafeNet
authentication. Corresponds to the UI setting (Policy tab) called: ‘Only
display SafeNet credential tile’ This is the default value
[1] Authentication can be performed using SafeNet or third-party
credentials, but the Microsoft credential tile is hidden. Corresponds to
the UI setting (Policy tab) called: ‘Hide Microsoft credential tile’
[2] Authentication can be performed with third-party or Microsoft
credentials and ONLY third-party or Microsoft credential tiles are
displayed. Corresponds to the UI setting (Policy tab) called: ‘Hide
SafeNet credential tile and show all available’
|
LocalUserOrGroup_In |
This policy setting configures what local users are subject to using strong authentication (OTP)
[ ] Not configured
[ComputerName\Group Name] Only the provided group must use strong authentication
NOTE:
if you define a group or multiple groups in this setting you must also
set DomainUserOrGroup_Ex with a value of ‘*’, meaning all but the
defined local groups of users are excluded from strong authentication.
|
ThirdPartyFilter |
This can be set to 0 to “Allow all applications” or 1 to “Allow
SafeNet compliant applications”.
Some third-party credential provider software may conflict with the
working of the SafeNet Agent for Windows Logon. So, you can restrict
their access with this registry key and only allow certain supported
software to work with the agent
|
Communication Timeout: [ ] seconds |
This policy setting specifies the maximum timeout value for authentication requests sent to SAS
The setting corresponds to UI option: ‘Communication Timeout: [ ] seconds’ (Communications tab)
The default value is 120 seconds
|
Use Proxy for SPS |
Select to connect to the Service Provider Server via proxy server
This setting is used to connect to the Service Provider Server via proxy
server
|
Domain groups are not nested in Local group |
This policy setting can be enabled to improve logon performance if
(and only if) domain groups are not nested inside local groups
The setting corresponds to UI option called: ‘Domain groups are not nested in Local group’ (Policy tab)
[1] Improves WLA client performance when domain groups are not nested in local groups
[0] Used when domain groups are not nested in local groups (default value)
|
Failover Server (optional) |
This policy setting configures the secondary (failover) SAS
authentication server (or the Token Validation Proxy). Syntax is either
protocol followed by IP address and port (if non-standard) or protocol
followed by FQDN and port (if non-standard) , i.e.:
‘http://1.2.3.4:8080’ or ‘https://server.domain.com’. The setting
corresponds to UI options (Communications tab): ‘Failover Server
(optional)’ and when the default value is used (or when a custom value
is used with https): ‘Use SSL (requires a valid certificate)’
|
Log File Location |
This policy settings configures the client log file path and its
naming. The setting corresponds to the UI option called: ‘Log File
Location’ (Logging tab)
Refer to default value below for example syntax
Default value: [C:Program FilesSafeNetWindows LogonLogAuthGINA-{date}.log]
|
DomainUserOrGroup_Ex |
When any group is added to this setting, then the DomainUserOrGroup_In
entry remains empty. You need to set LocalUserOrGroup_In to ‘*’
|
Username |
This policy setting configures the proxy server username as used when
authenticating to the defined proxy server (if required), in order to
connect with the token validation service (e.g. SAS or a Token
Validation Proxy). The setting corresponds to the UI option called:
‘Username’.
Correct syntax is: ‘username’
NOTE:
Setting ‘Username’ also assumes setting ‘Proxy Server’ and ‘Password’,
and may also require setting ‘Use Proxy for SPS’ (if applicable)
|
Strip realm from UPN (username@domain.com will be sent as username) |
This policy setting determines if a UPN (username@domain.com) is sent
to the authentication server as-is, or if the portion following the
username is removed (stripped).
The setting corresponds to the UI option (Communications tab) called:
‘Strip realm from UPN (username@domain.com will be sent as username)’
[1] Strips the @domain.com portion from the UPN when authenticating with SAS
[0] WLA will not sanitize the username (default value)
NOTE:
This is useful when users log in with UPN sometimes and SAS username
at other times and you need to sanitize what is being sent from
different protected resources so that SAS can still authenticate the
user(s) consistently
|
Custom Logo |
This policy settings allows you to set a custom image in the logon
screen for compatible credential providers (customization is not
compatible with the Windows V2 provider)
The setting corresponds to the UI option: ‘Custom Logo’ (Appearance tab)
Example syntax: ‘C:Program FilesSafeNetWindows LogoncustomLogo.bmp’.
NOTE:
The custom logo must be a bitmap (.bmp) of 110 x 110 pixels and must be available locally on the client
|
Enable Agent |
This policy setting configures the Windows Logon Agent (WLA) as
enabled or disabled. The setting corresponds to the UI option called:
‘Enable Agent’ (Policy tab).
When enabled, WLA will be displayed at logon
[1] WLA will be enabled and displayed at logon (default value)
[0] WLA will be disabled (remains installed and configured but is not used)
|
FilterProcess |
This policy setting can be configured to exclude applications from
SAS authentication. For example, Outlook may prompt for authentication
using OTP when WLA is installed with default options. To exclude Outlook
from using OTP, simply add the executable name (outlook.exe) to the
FilterProcess list of values. To exclude multiple applications from using
OTP, use comma for separation, e.g. “outlook.exe,consent.exe”.
NOTE:
The FilterProcess setting does not have an equivalent UI setting in
WinLogonManager, and can only be set directly in client registry or
using Group Policy.
|
To install the SafeNet Windows Logon Agent via GPO, follow these steps:
Creating a Distribution Point
To deploy an MSI through GPO, you need to perform these steps to create a distribution point on the Publishing Server
Log in to the server as an administrator
Create a shared network folder
Note
The shared network folder will contain the MSI package and the Agent Configuration file
Set permissions on this folder to allow access to the distribution package
Copy the MSI and Agent file to the previously created shared network folder
Deploying the WLA MSI
Follow these steps to deploy the WLA MSI to client machines:
Create an MST file
Copy Agent configuration file to client machines
Deploy MST and MSI files
Set the GPO order
Note
To deploy the SafeNet Windows Logon Agent MSI, you need to set AGENTMODE and JSONFILEPATH values. For this purpose, we use parameterized MSI Installation with the help of a transform (.mst) file
Create an MST file
To create an MST file, you need to install the ORCA tool. It is a free utility from Microsoft, available with the Windows SDK package (Developer Tool).
Tip
You can download the ORCA tool here
After the successful installation of the tool, right-click the SafeNet Windows Logon Agent MSI file in the previously created shared folder
Click Edit with Orca
Click Transform > New Transform
In Orca Editor, click Property from Tables in the left pane
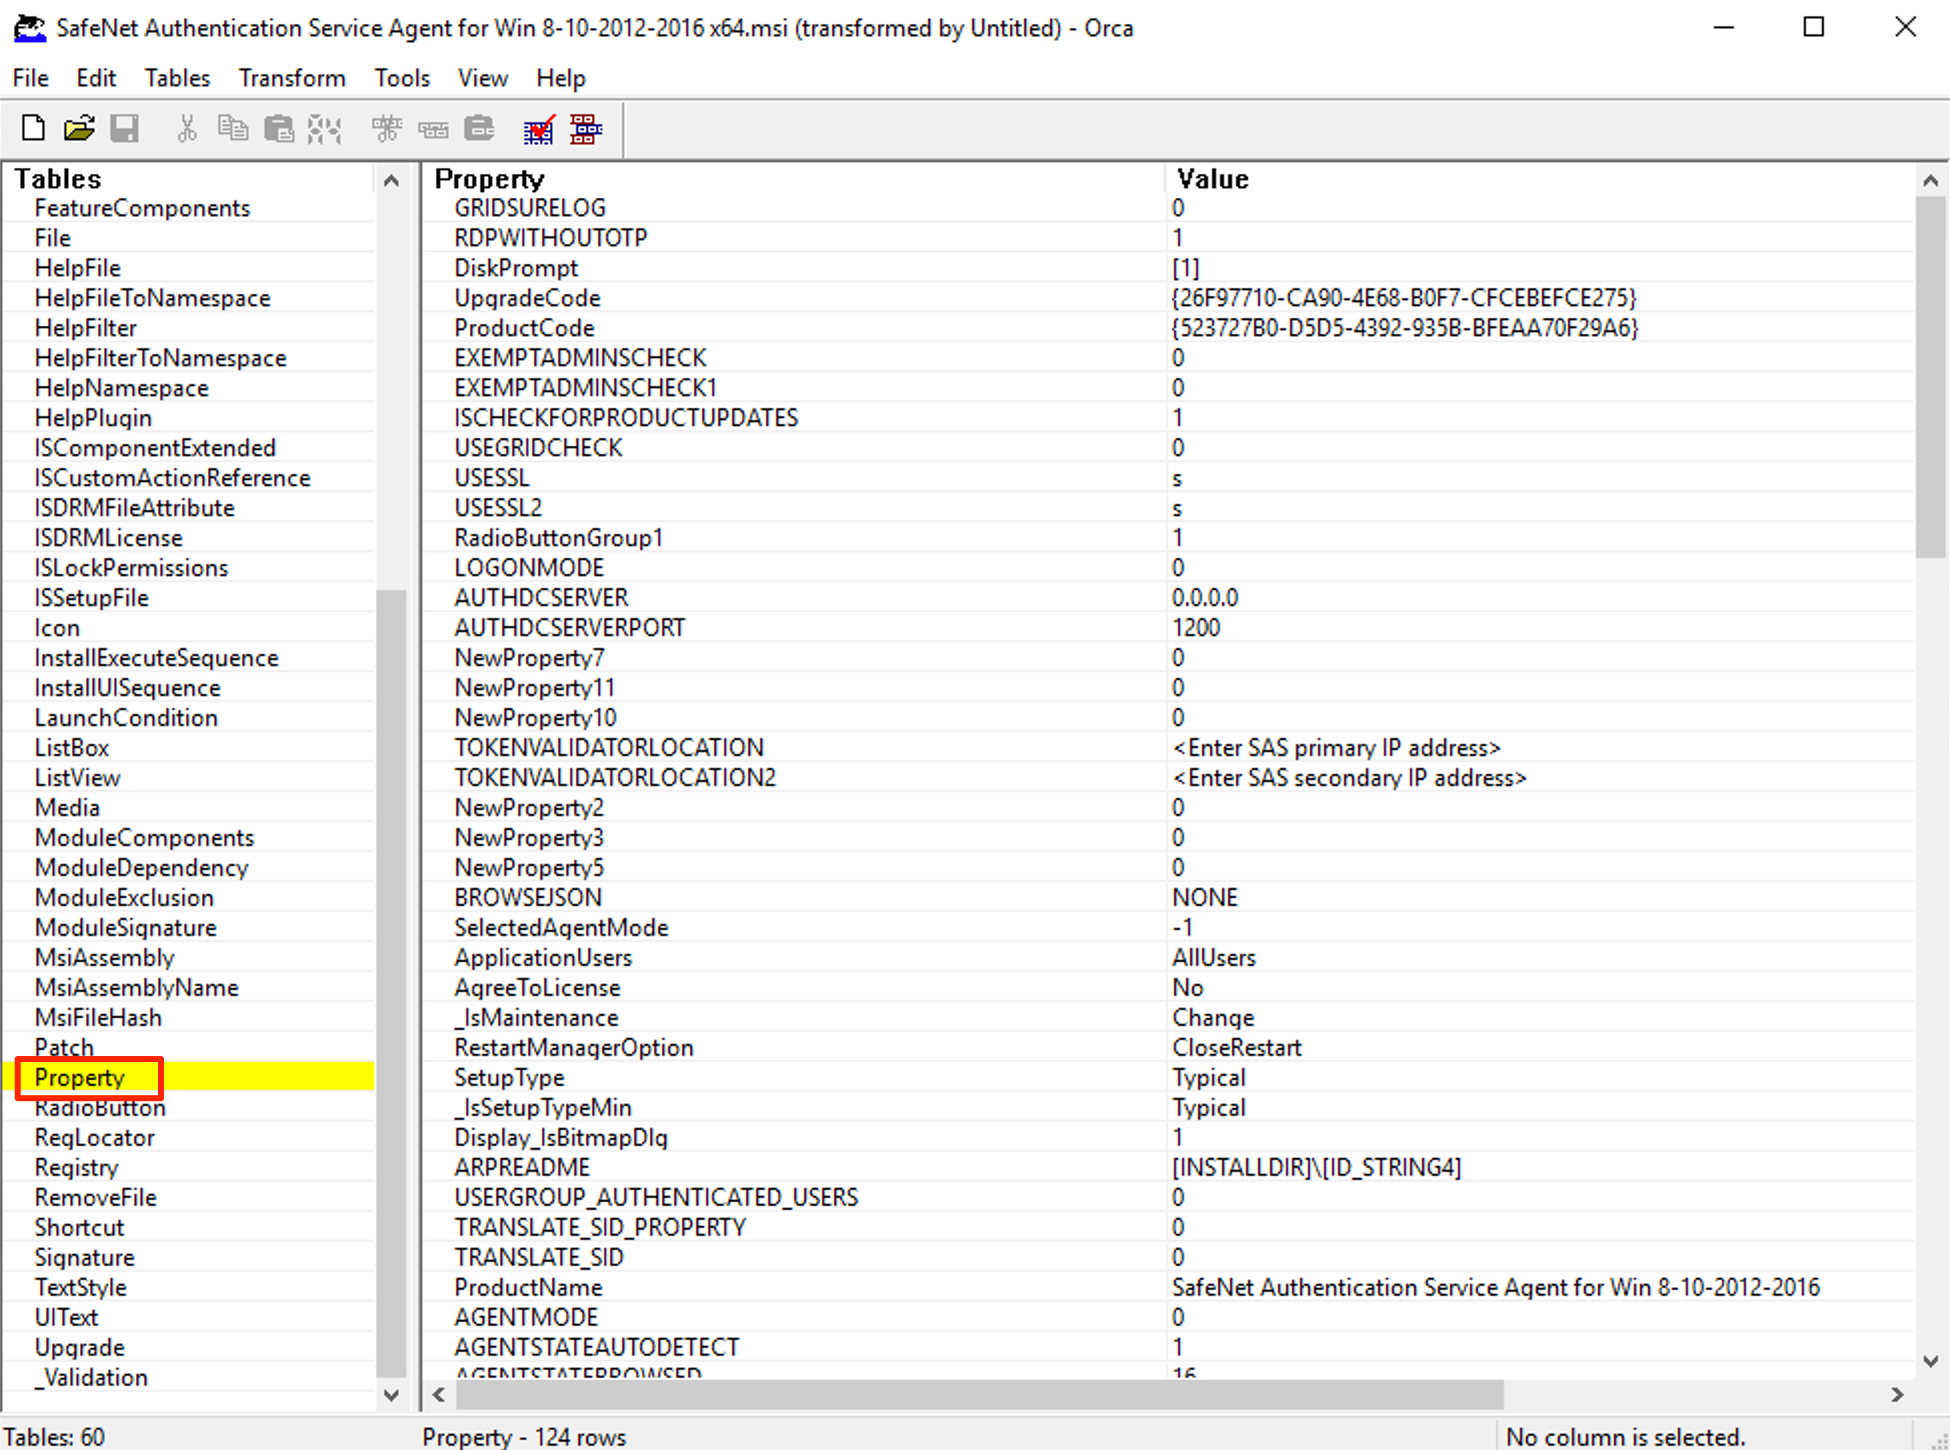
Figure: MSI properties in Orca. Double-click the value of property AGENTMODE and set it as 1

Figure: Setting agent mode to 1 (enabled). Double-click the value of property JSONFILEPATH and set it to the path on the client machine where the Agent configuration file will be copied to

Figure: Setting path to STA key file. Click File > Generate Transform…
Save your Transform (.mst) file with a desired name
Copy the Agent configuration file to client machines
Perform these steps to copy the Agent configuration file to the client machines using GPO file distribution:
In the Group Policy Management Editor navigate to Computer Configuration > Preferences > Windows Settings > Files

Figure: Distributing the key file to clients. Right-click Files and select New > File
In New File Properties select Create from the Action dropdown
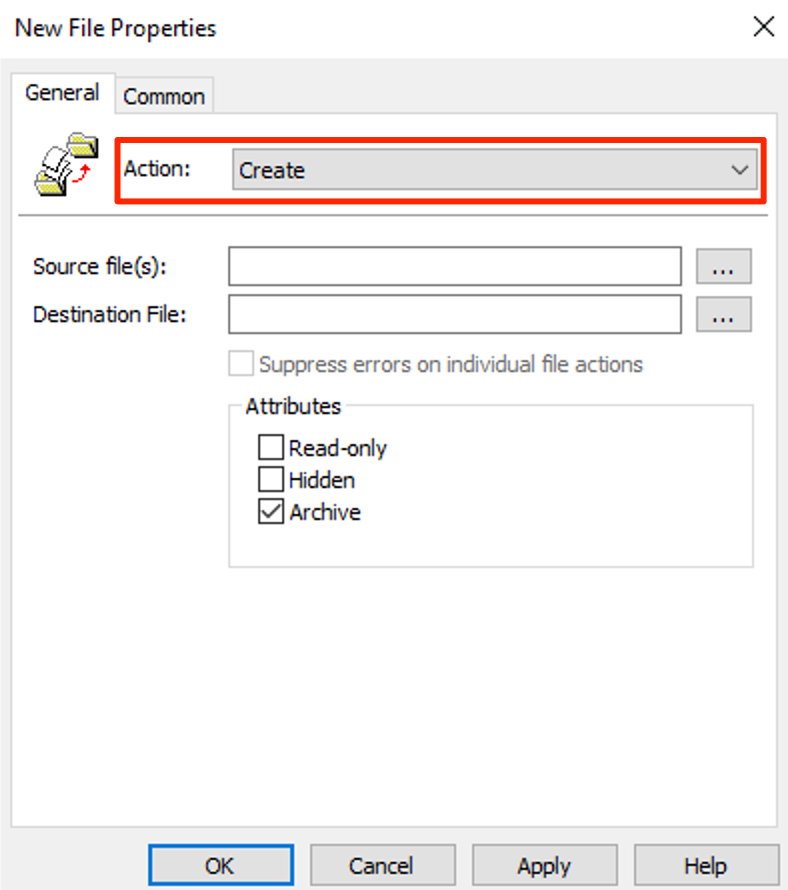
Figure: Create file action. In the Source file(s): enter the UNC path of a shared folder and in Destination File: enter a path on the client machine where the agent configuration file will be stored

Figure: Create file action (cont.).
Note
Keep the Agent COnfiguration file in the shared folder
Deploy MST and MSI files
Perform these steps to deploy the MST and the MSI files:
In the Group Policy Management Editor navigate to Computer Configuration > Policies > Software Settings > Software Installation
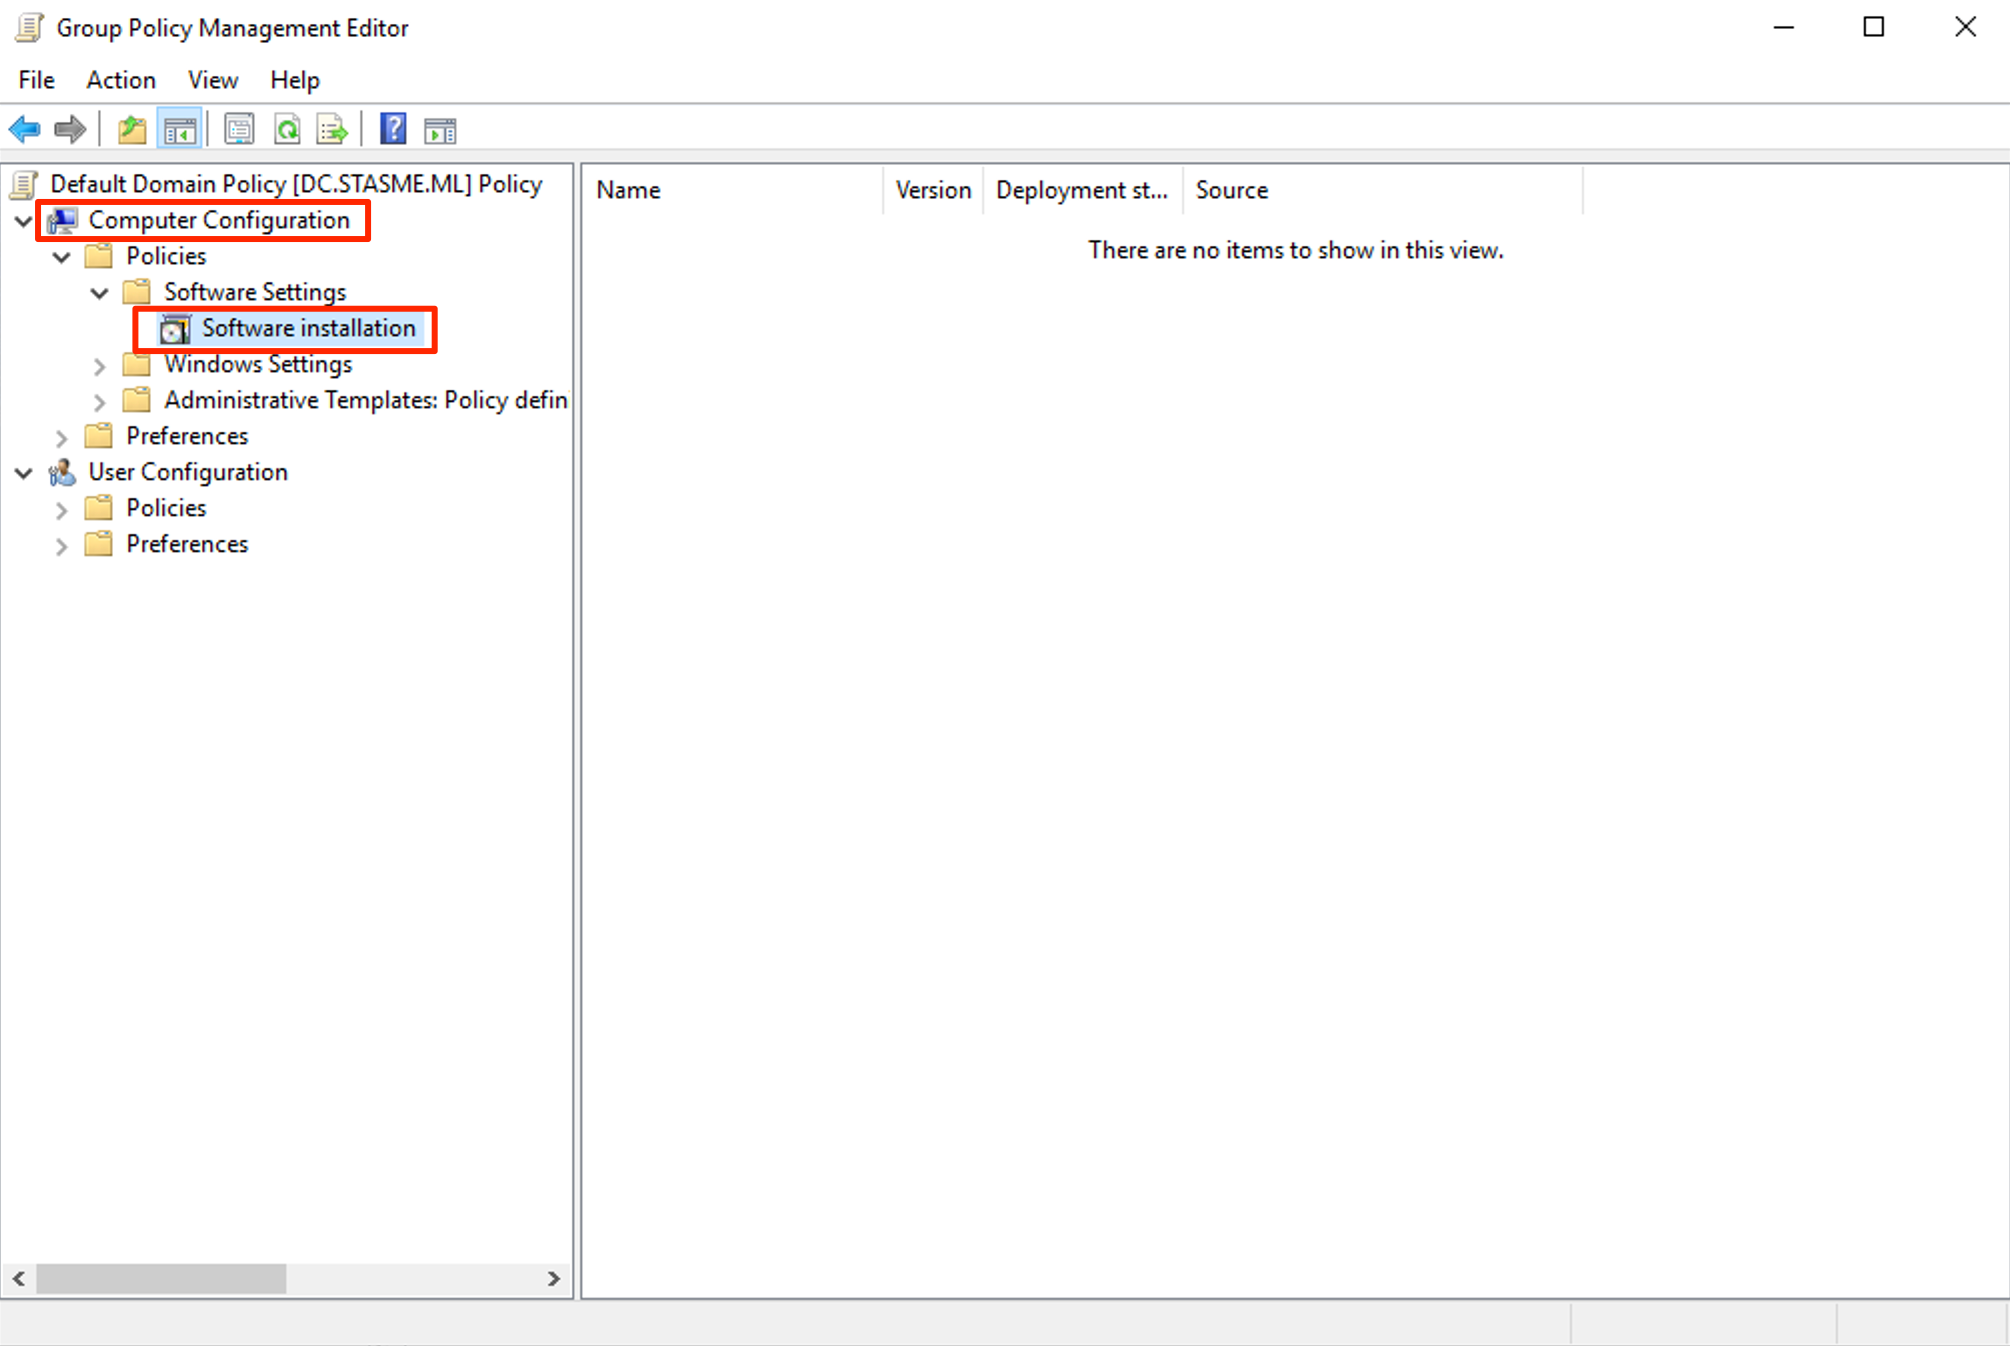
Figure: Configuring software deployment. Right-click Software Installation and slect New > Package…
Browse and select the SafeNet Windows Logon Agent MSI file from the previously created shared folder
In Deploy Software pop up, select Advanced and click OK
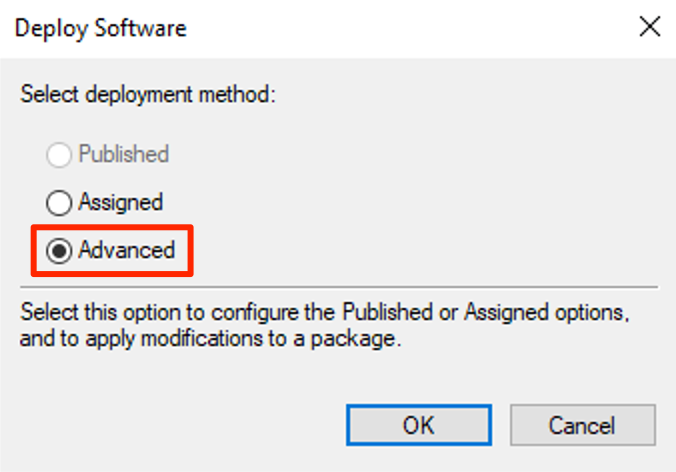
Figure: Using the advanced method for more flexibility. Go to the Modifications Tab, and click Add…

Figure: Select Modify to use the transform. Select the MST file and click OK
Note
Both the MST and the MSI should be selected from the shared folder
Setting the GPO order
If there are more than one GPO linked to an OU/Domain, then the processing order of the GPOs is determined by link order. The GPO with higher link order will be processed first
Important
The GPO deploying the WLA Agent Configuration file has to be deployed before deploying the WLA MSI
Open the GPMC console
Select the Domain/OU to which GPOs are linked
In the right-pane, click Linked Group Policy Object tab
Ensure that the GPO - Deploy SafeNet WLA Agent Configuration file has higher Link Order than the GPO - Deploy SafeNet WLA MSI and MST. Change the Link Order accordingly, if required

Figure: Setting GPO policy order.
The GPO based deployment if SafeNet Windows Logon Agent (WLA) is complete.
JSON based agent config deployment
When the WLA is downloaded from STA it bundles a *.agent file containing JSON formatted configuration. By default the agent file will contain the primary and secondary authentication service URL as well as the client secret. With a little bit of skill and luck however the agent configuration in said file can be expanded on to apply additional settings.
Tip
When installing the administrator simply needs to bundle the .agent file with the installer and it will apply it’s settings without the need for MSI switches or group policy.
The following is an example .agent configuration file that enables authenticated communication over proxy server:
 1{
 2   "Data": {
 3         "Communication": {
 4                "PrimaryTokenValidatorUrl": "uRL",
 5                "SecondaryTokenValidatorUrl": "uRL",
 6                "BsidKey":  "keyFileValue",
 7                "UseProxy": "1",
 8                "ProxyServer": "1.2.3.4:443",
 9                "ProxyUser": "jonas",
10                "ProxyPassword": "password123"
11         }
12   }
13}
Customization
The following section outlines possible customizations.
Improving interactive logon User Experience (U/X)
The default logon message(s) introduced by the Windows Logon Agent can be tailored to customer needs with messages replaced by modifying language files. This can be achieved either post installation (as seen below) or prior installation (by modifying the MSI package itself).
Tip
The below instructions details a “textbook” approach to modifying the U/X. For demo purposes you can simply edit and save the existing file using any test editor (no need to backup the file or use the registry etcetera).
The following instructions changes the most often seen user dialog:
Press the Windwows key and e simultaneously to bring up File Explorer
Navigate to:
"Program Files\SafeNet\Windows Logon\languages\en\"Copy and paste the file
LogonClient.cclgiving it a new name (e.g.LogonClient_v2.ccl)Open the new file in your text editor of choice and search and find: “;122”
Modify the current text with your own text, e.g.:
Press ENTER for Push OTP!
Exit saving the file
Press the Windwows key + r simultaneously to bring up the Run command
Type regedit and press Enter to launch the Registry Editor
Navigate to:
HKEY_LOCAL_MACHINE\SOFTWARE\CRYPTOCard\AuthGINADouble-click to edit the key
LocalizedMessagesChange the key value to point to the new file (step 3 above)
Exit the Registry Editor
Log off or restart to review the implementation of your modified user dialogue.

Improving RDP User Experience (U/X)
As with the interactive login, when using RDP to connect to a WLA enabled host the default login screen presents multiple fields accompanied by text that may not be applicable to the customers use of the agent. Such field labels includes “RDP User’s IP” and “Please Enter your [PIN]..” as seen below.
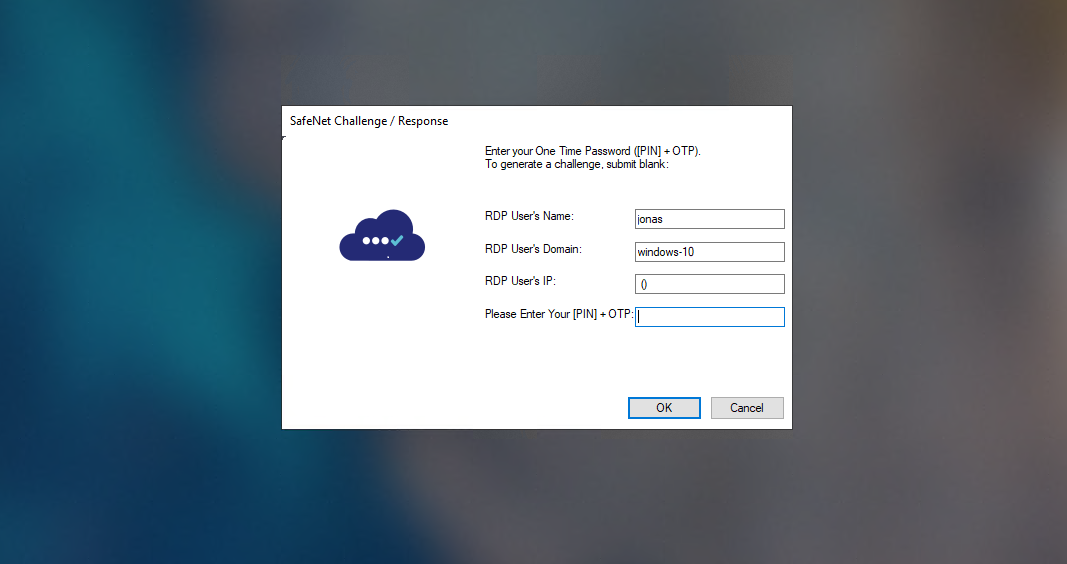
To address this issue there are two steps required:
Disable NLA on the target host
Press the Windwows key and e simultaneously to bring up File Explorer
Righ-click on Computer and select Properties
Select Advanced system settings
Click the Remote tab and uncheck NLA:

Figure: To disable NLA make sure it is unchecked. Click OK and exit
Modify the RDP file
Edit the RDP file to contain the following line:
enablecredsspsupport:i:0
Save and close the file
Warning
Make sure you understand any security implications of the above setting before implementing it.
Example RDP file
The following is an example RDP file for a VM in Microsoft Azure. To use this as a template, save the content to a file with the extension .rdp and modify line 23 (highlighted below) with the target IP address.
 1use multimon:i:0
 2desktopwidth:i:1920
 3desktopheight:i:1080
 4session bpp:i:32
 5winposstr:s:0,3,0,0,800,600
 6compression:i:1
 7keyboardhook:i:2
 8audiocapturemode:i:0
 9videoplaybackmode:i:1
10connection type:i:7
11networkautodetect:i:1
12bandwidthautodetect:i:1
13displayconnectionbar:i:1
14enableworkspacereconnect:i:0
15disable wallpaper:i:0
16allow font smoothing:i:0
17allow desktop composition:i:0
18disable full window drag:i:1
19disable menu anims:i:1
20disable themes:i:0
21disable cursor setting:i:0
22bitmapcachepersistenable:i:1
23full address:s:40.69.70.188:3389
24audiomode:i:0
25redirectprinters:i:1
26redirectcomports:i:0
27redirectsmartcards:i:1
28redirectclipboard:i:1
29redirectposdevices:i:0
30autoreconnection enabled:i:1
31authentication level:i:2
32prompt for credentials:i:0
33negotiate security layer:i:1
34remoteapplicationmode:i:0
35alternate shell:s:
36shell working directory:s:
37gatewayhostname:s:
38gatewayusagemethod:i:4
39gatewaycredentialssource:i:4
40gatewayprofileusagemethod:i:0
41promptcredentialonce:i:0
42gatewaybrokeringtype:i:0
43use redirection server name:i:0
44rdgiskdcproxy:i:0
45kdcproxyname:s:
46drivestoredirect:s:
47enablecredsspsupport:i:0
Uninstalling
The WLA can be uninstalled either from Control Panel, by running the MSI again -or silently using the following command:
msiexec /x <installerName>.msi
Warning
If the Windows Logon Agent was installed using the provided .exe then you cannot uninstall it using the .msi and vice versa. Doing so may lead to a situation where the agent cannot be fully uninstalled.
Upgrading
//TODO: Get clarification from R&D on upgrade procedure and supported from versions: upgrade from 2.x appears not to work.
msiexec /i <installerName>.msi /quiet REINSTALLMODE=vomus REINSTALL=ALL
With regards to the use deployment tools it’s important to note that WLA currently does not increment the ProductCode value. Tools such as Microsoft SCCM uses this property to see if the software is already installed; The comparison of UpgradeCode determines product family (e.g. WLA) and ProductCode determines what version is installed versus what version is about to be installed.
Note
With ProductCode being the same, this approach to upgrade will not work unless the MSI is modified and re-signed using a trusted certificate.
Appendix
Installing with log to discover MSI properties
Installing with a log file created locally on the target machine is useful for understanding general installation behavior as well as for troubleshooting purposes, but more so in the scope of deployment automation: to understand what key values (properties) of the installation might be manipulated, that is: supplied as installation switches (as discussed in this guide), in a transform, or modified in the package itself.
Install with logging
Open a command prompt (cmd)
Change directory (cd) to where the WLA installer package reside
Execute the following command to install with a local log file generated:
msiexec /i <installerName>.msi /L*V "C:\wla_installation.log"
Review the log file
Allow the installation to complete (interact with installer as necessary)
Open the log file in your text editor of choice
Examine the log for the occurrence of
Property(S):
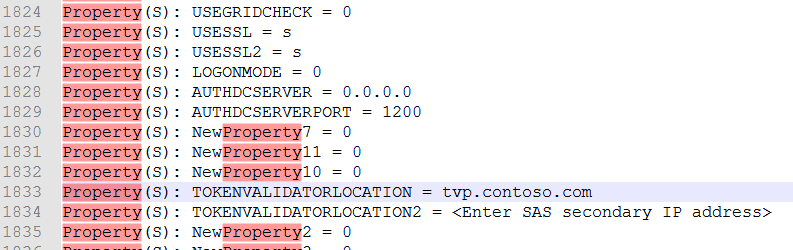
Tip
Attempt to match the Property and its value to provided input or default input during installation. For example you might find that 1 represents a checked box in one UI screen and that s represents a checked box in another screen.
Using MS Orca to discover MSI properties
An alternative to working from installation log is to use Microsoft Orca, a graphical MSI editor shipped with the Windows 7 SDK.
Tip
You can download the ORCA tool here
Using Orca to view the MSI Property table
Press Windows + E to bring up File Explorer
Browse to the directory where the WLA installer package resides
Right-click on the package and select Edit with Orca from the context menu
In table column (right hand pane) scroll down and select the Property row
Scroll the left hand pane to discover key value pairs to can potentially be used during automated deployment.
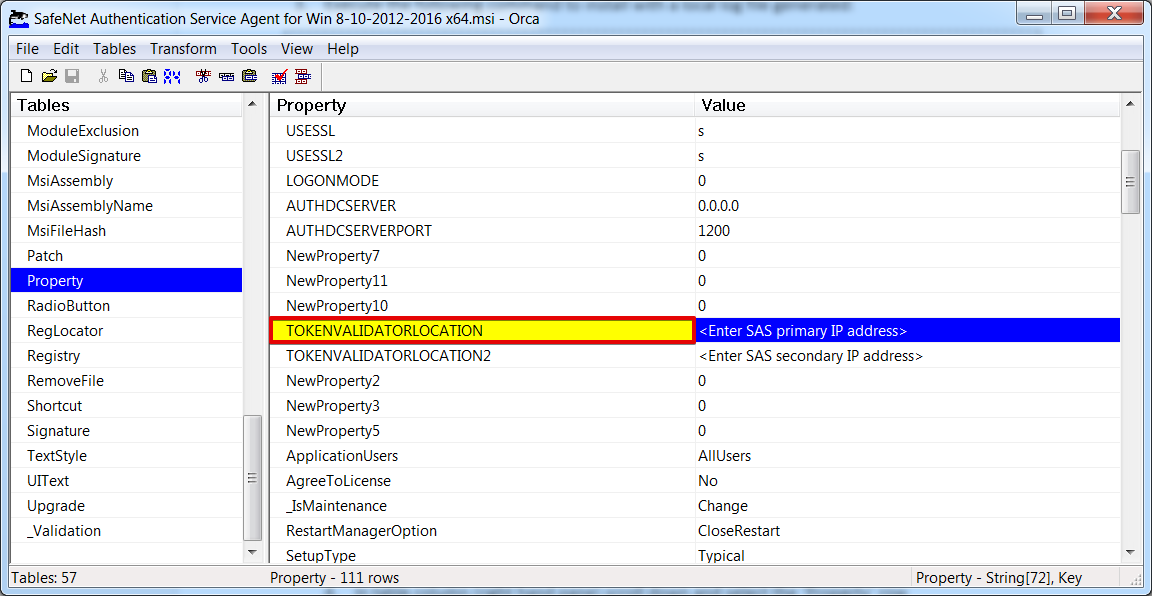
Note
Not all listed properties will work. You must test each property to establish if it can be used and what are its valid potential values.
Traffic
The following traffic must be allowed for the WLA to function.
Note
Allow or white-list hosts according to your STA hosting zone. If you are uncertain about what hosting zone to use, look at your operator (console) URL.
Service |
Port |
EU Service Zone |
US Service Zone |
Classic Service Zone |
|---|---|---|---|---|
AuthN |
443 |
cloud.eu.safenetid.com |
cloud.us.safenetid.com |
agent1.safenet-inc.com |
Push |
443 |
sps.eu.safenetid.com |
sps.us.safenetid.com |
sps.safenet-inc.com |
TLS 1.2
Attention
SafeNet Trusted Access currently implements a requirement on TLS v1.2.
Some Operating Systems such as Windows 7 does not support TLS 1.2 natively and the use of Windows Logon Agent will fail unless protocol support is modified.
To learn more, please refer to Microsoft documentation
Working with the Registry
Registry entries for WLA largely reflects GUI options in the Logon Manager app and GPO (ADMX), however some discrepancies exist where more control is available through registry than GUI or Group Policy. This includes but is not limited to the ability to set language file location.
The WLA registry keys are available under:
HKEY_LOCAL_MACHINE\SOFTWARE\CRYPTOCard\AuthGINA
Creating a custom MSI package
In case you want to add your own key file or display your own customized messages in the login screen, but you do not, or cannot externalize these configurations (replacing the UI language between install and reboot might be perceived as a challenge by the customer), one option is to modify the MSI itself. This does away with the need for command line switches and dependency on GPO’s, batch jobs or PowerShell scripting. On the flip side, the procedure is tedious and prone to errors and will make upgrades more challenging.
Warning
The procedure may void customer support or make interaction with Thales Support all the more difficult.
Replacing file content of the MSI cabinet file
This approach will require changing hashes of files modified or replaced, updating file versions and rebuilding and resigning the MSI. If you only need to set a few parameters on the MSI, please refer to the second example (below) instead. In the example we replace the key file, but the procedure is applicable to other content as well.
Open a command prompt (cmd)
Change directory to where you have the MSI package to be modified
Extract the cabinet file containing the default
Agent.bsidkeyfile using the following command:
msidb.exe -d <installerName>.msi -x Data1.cab
Remove the cabinet file from within the MSI by executing the following command:
msidb.exe -d <installerName>.msi -k Data1.cab
Using your archive tool of choice select the
Data1.cabfile and extract its content to a directory called :file:`Data1`Delete (or store elsewhere) the original
Data1.cabfileBrowse to the folder :file:`Data1`
Delete the existing
Agent.bsidkeyfilePaste your virtual server specific
Agent.bsidkeyfile into the directoryPaste the
wla.ddffile file into the :file:`Data1` directoryFrom a command prompt and standing in the :file:`Data1` directory, execute command to create a new CAB file:
MakeCab.exe /F wla.ddf
Move the newly created cabinet file to parent directory (where the MSI package is)
Now import the modified Cab into the MSI package by executing the command:
Msidb.exe -d <installerName>.msi -a Data1.cab
Changing a Property of the MSI
This approach is less invasive and only changes property values within the Property table of the MSI. It can be used to set authentication server and various key values (basically anything you can set with external command line switches on the MSI).
Right-click the applicable WLA installer MSI file
From the context menu, select Edit with Orca.
In the Tables column (left hand side), scroll down to and select Property
Edit the appropriate values
Go to File and select Save (or Save As) from the menu
Again, go to File but now select Exit.
Updating MSI file hashes
If an MSI is modified beyond changing key value pairs, it will need to have its modified file’s hashes updated to the MSI tables or installation will fail. In this step you extract the original MSI, add your changes, and then use the full set of extracted files (original + modified) to update the file hashes within the modified MSI. This negates the need to use functions like MsiGetFileHash(…).
Open a command prompt (cmd)
Change directory to where you have the original MSI package
Extract the MSI content of the original file using the following command:
msiexec /a <installerName>.msi /qb TARGETDIR=C:\extractedOriginalMSI
Replace (copy/paste) your modified content (for example key file) into the extracted folder
Change directory to where you have the modified MSI package
Update the hashes in your modified MSI package by executing the following command:
msifiler.exe -d <installerName>.msi -h -s C:\extractedOriginalMSI
Note
In the above example we already have a fully modified MSI as well as the original MSI at hand.
Making final touches with InstaEd MSI editor
InstaEd is used here over Orca because it is capable of comparing two MSI files. Orca can still be used, but it will take a little more effort.
Tip
You can download the InstaED tool here
Right-click your modified MSI and select InstaEd it! from the context menu
From the top menu bar click Transform and then select Compare against.. from the context menu.
Select the original (unmodified MSI package)
In the comparison, refer to green highlights and make notes of any difference that may be a concern, e.g. version changes on files.
Edit your modified MSI as applicable using either Orca or InstaEd
Save the changes.
Testing an MSI for errors
If you modify the MSI package you will want to examine it for errors (as well as run test installation before any production deployment).
Attention
Because error checking may show “errors” in the GA release MSI file (the original unmodified package), you should run the command outlined below, first on the original file and then on the modified file.
Open a command prompt (cmd)
Change directory to where you have the [original] MSI package to be modified
Run the following command on the MSI to create a text file listing possible MSI errors:
msival2 <installerName>.msi "darice.cub" /l C:\wla_errors.txt
Repeat the above steps but examining your modified MSI package
Use your diff tool of choice to understand what errors your modifications may have incurred.
Signing the modified MSI with a code signing certificate
The MSI may need to be re-signed with a certificate trusted in the organization where the MSI is to be installed. If the MSI is not signed, then installation may fail or produce warning messages.
Open a command prompt (cmd) and navigate to the folder where you have the modified MSI
Sign the modified MSI using your code signing certificate:
Signtool.exe sign /f codeSigningCert.crt /cng "Luna Cryptographic Services for Microsoft Windows" /kc hsmPartition /tr http://timestamp.digicert.com /td sha256 /fd sha1 <installerName>.msi
Signtool.exe sign /v /f "codeSigningCert.pfx" /p "PASSWORD" /v <installerName>.msi