Thales OTP (OATH) for 3rd party use
Overview
OATH or Open Authentication is a standard ensuring interoperability between authenticators and authentication servers. Implementing for OATH is what allows Microsoft, DUO, Okta and a range of other providers to use Thales authenticators such as the OTP 110 or the OTP Display Card.

This document provide step-by-step guidance on how to support the most popular third party services. In addition, this document also provides information around the technology involved (see Appendix) so as to equip You to make further integrations or adaptations.
Determining what authenticator to order
The following diagram provides a simplified decision tree for selecting an authenticator with respect to use case or authentication server used. Work with your Thales account team to map the authenticator requirement to a valid SKU. When in doubt: request a ‘sample’.

Note
This decision tree focuses on the use of OATH OTP authenticators. Additional authenticators are available through Thales, e.g: smartcard, pattern-based (GrIdSure), SMS, Voice, Email, authenticator app…
Microsoft Azure AD & Office365
This guide documents the procedure for importing the OTP 110 authenticator for use with Office365 or Azure AD when the SafeNet Trusted Access IdP is not used for Access Management.
Warning
Before attempting seed import into a Microsoft environment, establish that:
Your seed file adheres to the required format.
You have Global Administrator privileges in Microsoft Azure.
Microsoft proprietary seed format
The “seed” contains the unique programming of each authenticator including it’s shared secret and associated attributes. Importantly, Microsoft does not implement best practices seed transport protocols (PSKC) and requires the seed be provided in clear text over CSV. This format is only available from Thales on request using a specific SKU.
Review current Azure AD tenant settings
Once the seed file has been updated, you need to establish that the Azure AD (AAD) tenant supports the configuration of MFA, and if so: that settings are fit for purpose.
To review Azure AD tenant settings:
Open your browser of choice and navigate to the AAD portal at: https://portal.azure.com
When prompted, authenticate with administrative privileges
Click the search bar (top) and enter “MFA” selecting Multi-Factor Authentication from the results:

Figure: Search or navigate to ‘Multi-Factor Authentication’. Attention
If the ‘Multi-Factor Authentication’ page is not listed the customer organization lacks the necessary subscription level (P1 or P2) with Microsoft. In this case it is best to position SafeNet Trusted Access (STA) instead of upgrading the Microsoft plan.
In the ‘Multi-Factor Authentication’ view, click Additional cloud-based MFA settings:

Figure: Click to review or configure additional MFA settings. Scroll down the page and review the various settings, then click Save

Figure: Make sure only relevant options are enabled. Attention
Consider deactivating ‘call to phone’, ‘text message to phone’ due to risks associated with SIM cloning and social engineering. In the example below we have deactivated all but app and hardware token. Unfortunately no further granularity is available at this time through Microsoft. For higher assurance authenticators and enforcement, consider SafeNet Trusted Access (STA).
Enable MFA for user(s) in O365
Once we have established that the AAD tenant supports (hardware-based) MFA we need to enable it for target users. This is a two-step process starting with enabling MFA for the user(s) in O365 (this section) and then allocating MFA authenticators to the users in the AAD portal (step 4).
Navigate to the Office 365 admin portal available at: https://portal.office.com/AdminPortal/
Using the navigation left hand side, click Users and then Active Users
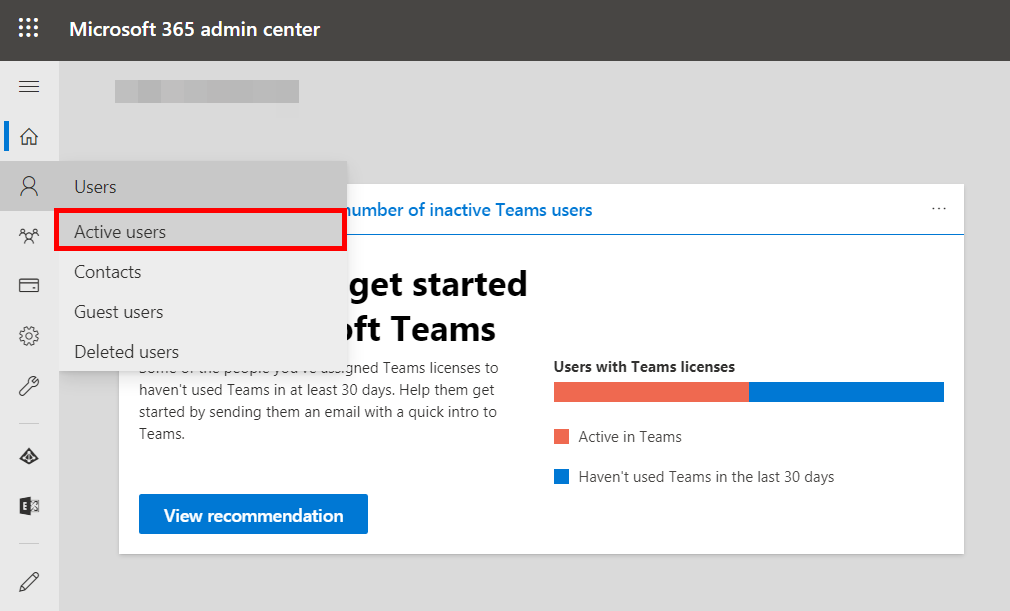
Figure: Selecting Active Users. In the Active Users view, click to select Multi-factor authentication:

Figure: Click Multi-factor authentication to enable MFA for single or multiple users. Follow instructions in the appropriate tab:
Click the search action icon to expand a search field into view
Type the target user’s name hitting the Enter key to execute the search
Click to enable the checkbox next to the user (left hand side) and then click Enable
When prompted click enable multi-factor auth to proceed
In the confirmation view, click Close to finish.
In the multi-factor authentication view, click on bulk update
In the popup window, click BROWSE FOR FILE… and select your bulk processing file
Click on the proceed action icon (lower left) to continue with the import
Repeat (proceed) until processing has completed successfully.
Tip
An example bulk import CSV file can be downloaded
here.
Import Authenticator seed file into Azure AD
Our final step before verifying the solution is to import the authenticator seed file from Step 1 into the AAD tenant.
In the AAD portal and in the Multi-Factor Authentication view still, click OATH tokens left hand side:
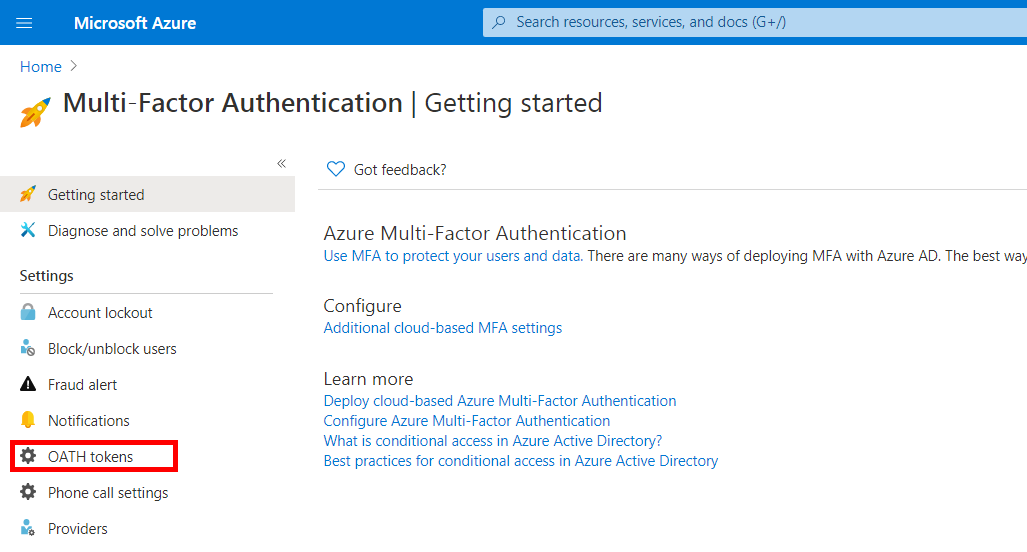
Figure: Select OATH tokens to import hardware authenticator seeds. Click Upload and browse to select your Thales seed file, clicking OK to continue:

Figure: Select Upload to import authenticator seed(s). Click the Refresh button to update the page (or it will remain unchanged):
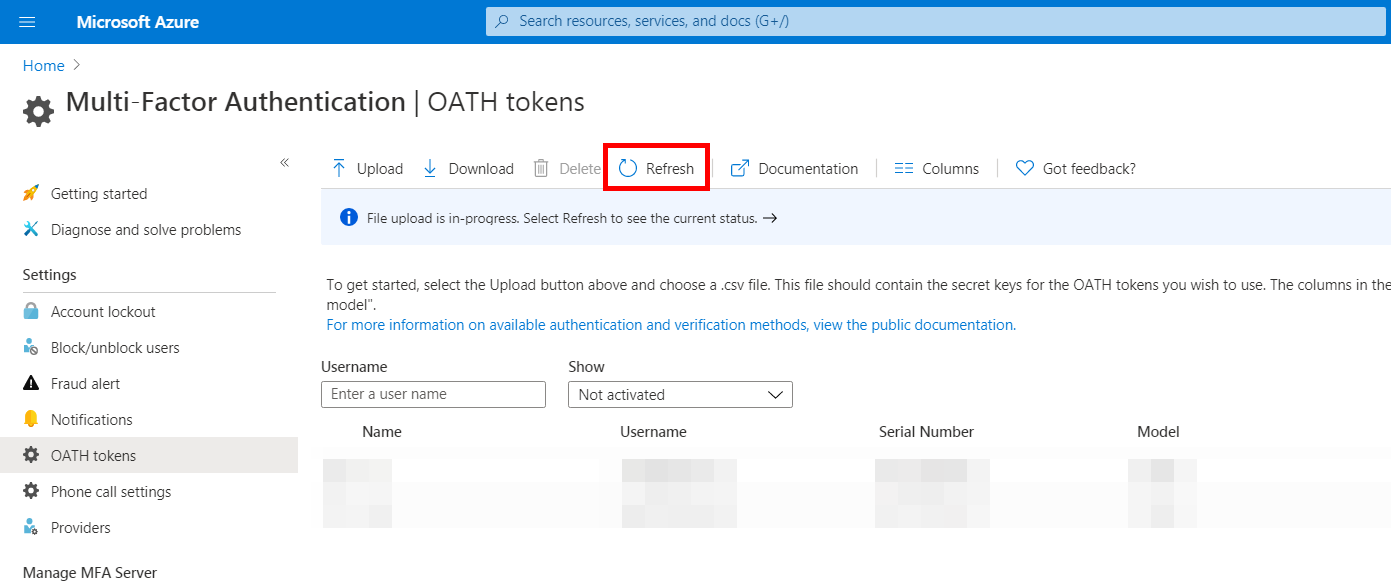
Figure: You must click refresh or the view will not reflect changes made. While the process is completing, View details may show completion feedback:

Figure: Clicking view details after refresh may produce import success/failure status. Click Refresh again for good measure and then change the Show selector (dropdown) to the appropriate filter:

Figure: Applying a show filter should list imported MFA authenticators. Next, flip your hardware authenticators upside down to display their serial numbers:
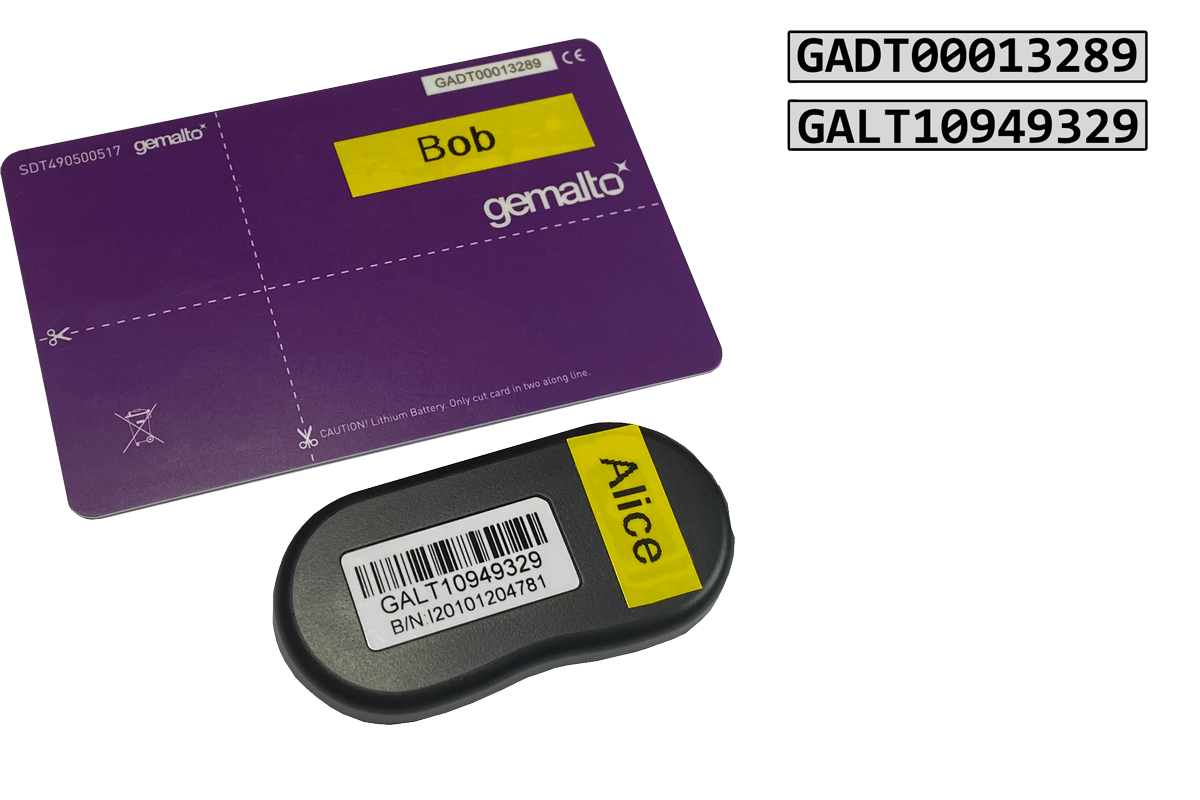
Figure: The flip side of each OTP authenticator reveals it's serial number. Matching the authenticator serial to the user displayed in the AAD portal, click Activate in the right-most column
Press the authenticator button to generate a One Time Password (OTP) and then enter the passcode in to Verification code field followed by clicking OK

Figure: Activation of authenticator using OTP. Repeat the activation process for any additional authenticator imported.
Verification
The integration of Thales OTP 110 authenticators into O365/AAD can be tested simply by authenticating to any app or endpoint part of the O365 offering. The expected behavior prompts for both password and MFA credentials.
An example login to account.office.com is shown below:
At the login prompt enter the username (UPN) followed by clicking Next:
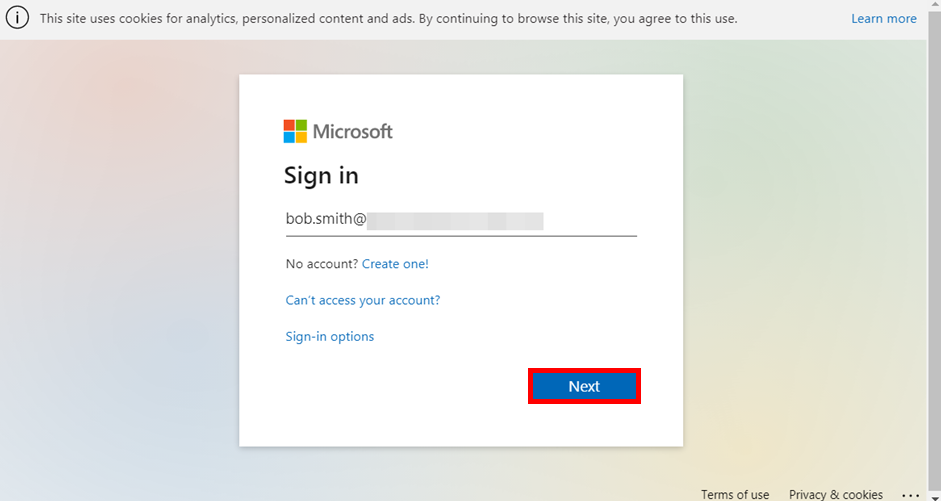
Figure: Enter UPN to proceed. Next, enter your fixed password credentials and click Sign in:
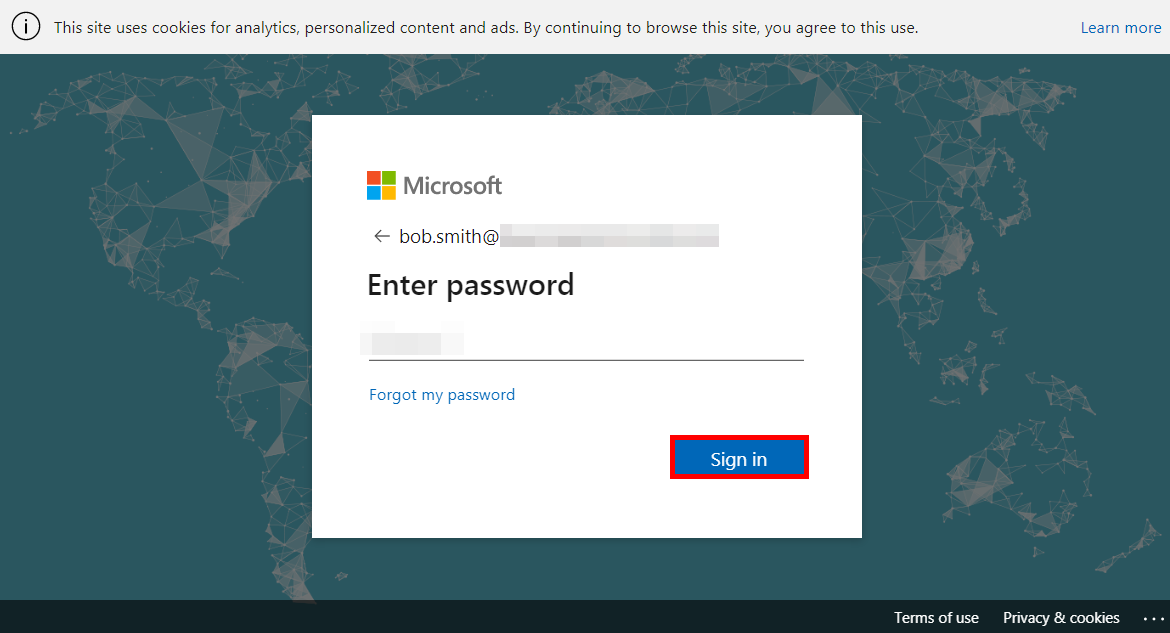
Figure: Enter password. Generate a One Time Password (OTP) on your OTP 110 authenticator and then input it into the Enter code field, clicking Verify:

Figure: Enter OTP as generated on hardware authenticator. Assuming correct authentication, the user is logged in:

Figure: Upon successful authentication the user is granted access.
Nexus Hybrid Access Gateway
This guide documents the procedure for updating the OTP 110 authenticator seed file for use with Nexus Hybrid Access Gateway when the SafeNet Trusted Access IdP is not used for Access Management.
Seed file modification
The seed file provided for 3rd party use in PSKC must be further modified to Nexus requirements. This includes iterating through the XML content to add a child element called <pskc:Suite>HMAC-SHA1</pskc:Suite> to each authenticator.
To modify the seed:
Download or Copy/paste below code snippet to file ensuring a
.ps1(powershell) extensionRight-click the file and select Run With Powershell from the context menu
Follow the on-screen instructions presented by the script.
Tip
To get the latest version of the Nexus script please click here to download it.
 1##########################################################################
 2# BROWSE TO SOURCE FILE FUNCTION:
 3
 4Function Open-File ([string]$initialDirectory) {
 5
 6[System.Reflection.Assembly]::LoadWithPartialName("System.windows.forms") | Out-Null
 7$OpenFileDialog = New-Object System.Windows.Forms.OpenFileDialog
 8$OpenFileDialog.Title = "Open source Nexus seed file:"
 9$OpenFileDialog.initialDirectory = $OpenInitialPath
10$OpenFileDialog.filter = "XML (*.xml)| *.xml"
11$OpenFileDialog.FileName = $OpenFileName
12$OpenFileDialog.ShowDialog() | Out-Null
13return $OpenFileDialog.filename
14}
15
16# Call the browse function above and store the selected file in a variable:
17$results = Open-File
18
19##########################################################################
20# APPEND SEED FILE WITH ELEMENTS/NODES
21
22# A hash table holds the namespace we need to be able to navigate with xPath:
23$ns = @{pskc = "urn:ietf:params:xml:ns:keyprov:pskc" }
24
25# load it into an XML object:
26$xml = New-Object -TypeName XML
27$xml.Load($results)
28
29# Iterate the XML document using xPath to locate the AlgorithmParameters element:
30Foreach ($item in (Select-XML -Xml $xml -XPath
31/pskc:KeyContainer/pskc:KeyPackage/pskc:Key/pskc:AlgorithmParameters -Namespace $ns)) {
32
33# Add element/node to AlgorithmParameters parent WITH namespace:
34$newElement = $xml.createElement('pskc:Suite', 'urn:ietf:params:xml:ns:keyprov:pskc')
35# Add the value to the key:
36$newElement.innerText = 'HMAC-SHA1'
37# Create the new node AND restrict it from writing to terminal:
38$item.node.AppendChild($newElement) | Out-null
39
40# Here is an example of updating an existing value within selected element:
41#$item.node.Lenght = "8"
42}
43
44##########################################################################
45# SAVE THE RESULTS:
46
47# Function to prompt the user to save the new CSV file created:
48Function Save-File ([string]$initialSaveDirectory) {
49
50[System.Reflection.Assembly]::LoadWithPartialName("System.windows.forms") | Out-Null
51
52$SaveFileDialog = New-Object System.Windows.Forms.SaveFileDialog
53$SaveFileDialog.Title = "Save generated Nexus HAG seed file as:"
54$SaveFileDialog.initialSaveDirectory = $SaveInitialPath
55$SaveFileDialog.filter = "XML (*.xml)| *.xml"
56$SaveFileDialog.FileName = $SaveFileName
57$SaveFileDialog.ShowDialog() | Out-Null
58$global:selectedFilePath = $SaveFileDialog.filename
59return $SaveFileDialog.filename
60}
61
62# Call the function to save the file prompting the user for location:
63$SaveMyFile = Save-File
64$xml.Save($selectedFilePath)
Appendix
CSV
According to Wikipedia: “A comma-separated values (CSV) file is a delimited text file that uses a comma to separate values. Each line of the file is a data record. Each record consists of one or more fields, separated by commas. The use of the comma as a field separator is the source of the name for this file format.”
Attention
If your authentication server requires the authenticator seed in CSV format you will need to pay special attention to the product SKU when ordering! Failure to do so will result in a PSKC seed file (default).
An example CSV document:
Serial Number,Secret Key,Manufacturer,Model,Start Date,Time Interval
GALT10949319,OPJI2CGKO083NKC37DI5NBGDI6MLFLTB,THALES,OTP110,2021-06-04T04:46:26,30
GALT10949320,0KR865GQTFRK2GSPRQI7PCL6AOKHK3H4,THALES,OTP110,2021-06-04T04:46:26,30
GALT10949324,PNMEAK6HM0ISADI9L4F1K3I5MS3EEM43,THALES,OTP110,2021-06-04T04:46:26,30
PSKC
PSKC or Portable Symmetric Key Container is a standardized container format used for transporting symmetric keys and their metadata. In context of OTP, adherence to the PSKC standard ensures interoperability between manufacturers of authenticators and authentication systems.
Note
Because interpretation may differ across vendors it is some times necessary to manipulate the PSKC to achieve interoperability. In other cases, as with Microsoft, the standard is not followed at all and another format must be produced.
Tip
For more information about PSKC, please refer to IETF
XML
As noted, the authenticator seed for is typically provided as a Portable Symmetric Key Container (PSKC) which in turn is provided as an Extensible Markup Language (XML) document (with additional layers of security through the Thales fulfillment process). In order to modify the PSKC to fit specific and sometimes proprietary requirements of the 3rd party authentication server it is important to have a basic understanding of XML.
To begin with, XML documents have hierarchical tree-like structure with branches or nodes extending from a root. The root is referred to as the root element with the next item being a child element (or child ‘node’) of the root. From the immediate child’s point of view, the node above is a parent element (or parent ‘node’) and again the child below is a child element (or child ‘node’) or a sub child seen from the root.
An example XML document structure:
<root>
  <child>
   <subchild>.....</subchild>
  </child>
</root>
Note
It is important to understand these relationships in order to be able to manipulate the XML in order to add, remove or update content in the PSKC document.
Namespaces
According to Wikipedia: “XML namespaces are used for providing uniquely named elements and attributes in an XML document. They are defined in a W3C recommendation. An XML instance may contain element or attribute names from more than one XML vocabulary.”
An example XML document structure with namespace:
<root xmlns:ns="urn:abc:ns">
  <ns:child>
   <ns:subchild>.....</ns:subchild>
  </ns:child>
</ns:root>
Note
The importance of namespaces on PSKC is that the elements inside the XML contains namespaces and that these must be handled when navigating the file programatically.