FreeRADIUS Agent for SafeNet Trusted Access
Overview
The SafeNet agent for FreeRADIUS extends the open-source FreeRADIUS project to offer a highly secure container-based service that enables legacy RADIUS clients such as VPN gateways and routers to perform authentication and authorization against SafeNet Authentication Service (SAS-PCE) or SafeNet Trusted Access (STA).
While abstracted from the customer through containerization it may be interesting to understand that the SafeNet agent for FreeRADIUS installs as a module to the open-source based FreeRADIUS server. In the SafeNet agent bundle, the FreeRADIUS server configuration has been configured on behalf of the customer to call the sasagent module for supported RADIUS protocol requests.
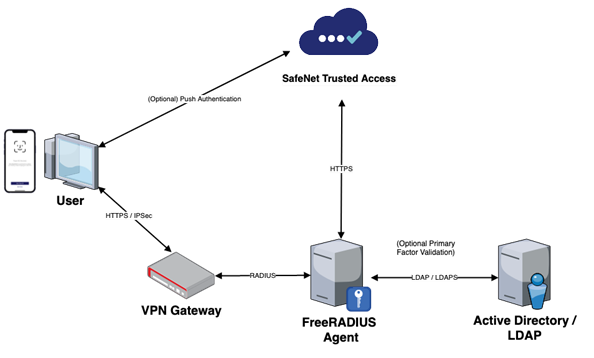
FreeRADIUS takes in a standardized RADIUS request over UDP on port 1812 (configurable) and if the client (e.g. the VPN gateway) is authorized based on the configured RADIUS clients list, the sasagent module will forward end-user authentication and authorization to either SafeNet Authentication Service (SAS) or SafeNet Trusted Access (STA).
This ‘forwarding’ as well as the return decision (accept/reject) is done using SafeNet proprietary encryption over TLS (TCP port 443) facilitated through the use of a key file (the Agent.bsidkey) as well as explicit authentication node (“auth node”) authorization in the SAS or STA virtual server.
Installation
Open a terminal to the FreeRADIUS agent host
Install yum-utils, if not already present:
sudo yum install -y yum-utils
Add the Docker repository:
sudo yum-config-manager --add-repo https://download.docker.com/linux/centos/docker-ce.repo
Install Docker (and Containerd) answering yes to prompts:
sudo yum install docker-ce docker-ce-cli containerd.io -y
Start Docker:
systemctl start docker
Create a Docker service user and group:
sudo useradd freeradius
sudo usermod -a -G docker freeradius
Enable Docker and Containerd to run as a service:
sudo systemctl enable docker.service
sudo systemctl enable containerd.service
Load the FreeRADIUS Agent Docker image:
docker load -i <image name>.tar
Configuration
At a high level there are two major configuration steps once the SafeNet FreeRADIUS agent is installed:
The first step above configures FreeRADIUS to be able to address either SAS or STA with RADIUS related requests and the second step then configures any client -that is: any system or service that will authenticate users over RADIUS, to be authorized to send requests to FreeRADIUS.
Configuring FreeRADIUS
Download the Agent.bsidkey file
To download the key file:
Open a browser and navigate to SAS/STA
Authenticate as operator and then navigate to the Comms tab
Click to expand Authentication Processing and then expand Authentication Agent Settings

Click Download to generate and save the key file
Transfer the
Agent.bsidkeyto the FreeRADIUS host using your tool of choice
Running the configuration script
To run the configuration script:
Open a terminal to the FreeRADIUS agent host
Run the
FreeRADIUSv3.shby executing the following commandsudo sh ./FreeRADIUSv3.sh
Press Enter when prompted to start the (re)configuration
Provide neccessary configurations for FreeRADIUS container to run. Press [Enter] to continue.
Press Y to switch to HTTPS (TLS)
The default protocol is HTTP. Change to HTTPS (recommended)? Y/N
If using SafeNet Trusted Access (STA) ensure that Y is entered.
y
Type the FQDN of your SAS or STA service (refer to table below for guidance) and press Enter
Please enter the Fully Qualified Domain Name (FQDN) of the authentication service (SAS/STA).
NOTE: If using SafeNet Authentication Service (SAS-PCE) IP address is optionally permitted.
cloud.eu.safenetid.com

Making sure the authentication endpoint is accessible...
The authentication endpoint is accessible.
Zone
FQDN
EU
cloud.eu.safenetid.com
US
cloud.eu.safenetid.com
Classic
agent1.safenet-inc.com
Press N when prompted about the API
Is the SAS RADIUS Client API URL accessible? Y/N
If using SafeNet Trusted Access (STA) ensure that N is entered.
n
Attention
The RADIUS Client API is responsible for updating the RADIUS Clients from the SAS server to the FreeRADIUS server when using an on-premise deployment model with SAS-PCE or SAS-SPE. This deployment model is out of scope for this documentation.
Type the path to the
Agent.bsidkeyand press EnterPlease enter the complete path of the agent BSID key file (Agent.bsidkey). ./Agent.bsidkey Making sure the agent BSID key file exists at the provided path... Agent BSID key file exists.Press N when asked about password concatenation (see note)
Do you want to enable validation of concatenated LDAP Password+OTP as a single field? Y/N
n
Tip
An existing alternative to password concatenation when multiple credentials are to be evaluated is to use Pre-Authentication Rules in SAS and STA.
Note
Pressing Y will configure a logic where the FreeRADIUS agent takes in a concatenated credential and then splits it using a defined delimiter. The split credentials are validated against a defined LDAP server as well as towards SAS or STA. From an end-user perspective the user will submit a single field credential, e.g
password-123456which is then split at the backend intopasswordand123456.Press Y when asked about silent response configuration (see note)
Do you want the service to be silent (do_not_respond) when SAS/STA is unavailable? Y/N
NOTE: Not responding may help customer controlled failover.
y

Setting Value Accordingly
Note
Pressing Y will configure the FreeRADIUS agent to simply not respond in case of authentication service failure (SAS or STA is down). This allows the customer or service provider to configure RADIUS clients to direct traffic towards a different FreeRADIUS agent (and it’s paired authentication service) to achieve High Availability (HA).
Attention
Pressing N will instead configure the FreeRADIUS agent to return
Access-Rejecton service outage, resulting in authentication failure.Press Y when asked about PEAP support (see note)
Do you wish to use default certificates for PEAP support? Y/N
y
Note
Pressing Y will use bundled self-signed certificates. These may or may not work with PEAP. If you do intend to use PEAP exit the script and generate or obtain the necessary certificates! If you do select N then additional prompts will follow. These are not documented here. If you need guidance on these prompts please refer to official Thales product documentation.
Type the RADIUS (authentication) port number, typically 1812 and press Enter
Enter Port Number for FreeRadius container.
1812
The Port is accessible.
When prompted about UTF8 support, press N (see note)
By default the FreeRADIUS agent is configured for ISO-8859-1 encoding. Change to UTF8? Y/N
NOTE: Changing to UTF8 may help support national characters such as å,ä,ö
(but these MUST be supported in the full architecture).
n
Note
UTF8 may be required if you expect to see national characters, e.g. user names containing å, ä, ö on the wire. Note though that most NAS will not support UTF8 and so supporting it in FreeRADIUS agent is not necessarily a full solution.
Either accept using SYSLOG for logging by pressing N or Y to use JSON written to file
Default log driver for FreeRADIUS container is set to 'SYSLOG'. Change to JSON-FILE? Y/N
n
Note
If you do select JSON-FILE then additional prompts will follow. These are not documented here. If you need guidance on these prompts please refer to official Thales product documentation.
Finally, the script prompts for using internal (default) or external SYSLOG. Press N for using local SYSLOG or Y to change to an external server
Do you want to use an external Syslog server? Y/N
n
Checking if syslog daemon is running on host machine..
Note
If you do select to use an external server then additional prompts will follow. These are not documented here. If you need guidance on these prompts please refer to official Thales product documentation.
Tip
If you want to automate this part of configuration for repeat use or to better support upgrading then you can do something like (based on above input as an example):
printf '%s\n' Y Y cloud.eu.safenetid.com N ./Agent.bsidkey N Y Y 1812 N N N | sh ./FreeRADIUSv3.sh
In the above example, input to script prompts such as Y (Yes) is provided, including line breaks n (newline).
If you do take this approach you have to stay on top of new prompts being introduced in later versions of the script!
Configuring client(s)
RADIUS clients such as your NAS or test tool must be added to the SafeNet FreeRADIUS agent, and in addition the FreeRADIUS agent itself must be added as a client (auth node) to SAS/STA. To do so follow the below instructions:
FreeRADIUS
To add and manipulate RADIUS clients, a SafeNet CRUD script called Client_Updater.sh is provided with the agent software bundle. This section describes how to manually create clients using the script.
Reading (viewing), Updating and Deleting clients is not explicitly documented here, but follows the same principle, using the V, U and D option respectively with the script.
Attention
Using the Client_Updater.sh script is relevant only if you are configuring the SafeNet FreeRADIUS agent against SAS Cloud or STA. If you are configuring an on-premise version of SAS, e.g. SAS-PCE or SAS-SPE then updating clients can be automated using the RADIUS API (out of scope for this documentation).
To add a RADIUS client:
Open a terminal to the FreeRADIUS agent host
Run the
Client_Updater.shby executing the following commandsudo sh ./Client_Updater
When prompted, type C, and press Enter
Type the IP address of your RADIUS client and press Enter
Type a name (any) for the RADIUS client and press Enter
Type a shared secret (the same secret must be in your client!) and press Enter

SAS/STA
Next, the FreeRADIUS host IP must also be added to SAS or STA as an Auth Node.
To add the FreeRADIUS agent host as SAS/STA auth node:
Open a browser and navigate to SAS/STA
Authenticate as operator and then navigate to the Comms tab
Expand Auth Nodes
Click Add
Provide relevant attributes including name and IP address
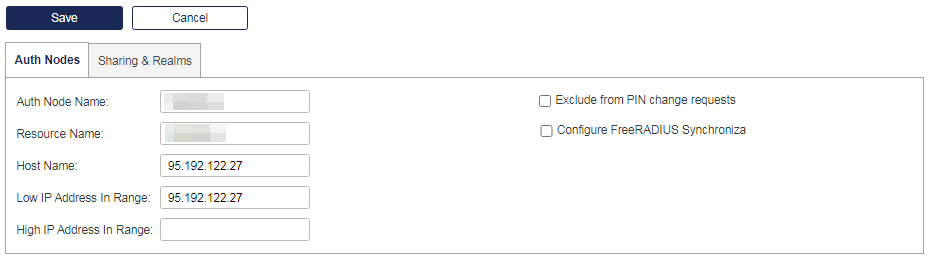
Click Save
Automatic service restart
By default the SafeNet FreeRADIUS container much like other containerized services will not start automatically. To ensure the service recovers on for example a system reset event or to simply avoid having to manually start and stop the container, a Docker restart policy can be set. The below command example configures the SafeNet FreeRADIUS container to always restart.
Note
For more information about Docker restart policies, please refer to Docker documentation
Configure FreeRADIUS to start automatically:
sudo docker update --restart always FreeRADIUSv3
Deployment Automation
Using Cloud-Init
The following is an example cloud-init file that can support some amount of deployment automation, namely installing and configuring Docker as well as loading the SafeNet FreeRADIUS container image. The file below was adapted for use with Microsoft Azure (see next section) and uses explicit commands in sequence. In general, it should be possible to use additional abstraction.
Note
Step by step usage of cloud-init is currently out of scope for this documentation, but the video in the previous section provides some insight.
Warning
This cloud-init is provided as an example only and should not be used in a production system without extensive review and testing.
Sample cloud-init file:
 1#cloud-config
 2runcmd:
 3- sudo yum install -y yum-utils
 4- sudo yum-config-manager --add-repo https://download.docker.com/linux/centos/docker-ce.repo
 5- sudo yum install docker-ce docker-ce-cli containerd.io -y
 6- sudo systemctl start docker
 7- sudo useradd freeradius
 8- sudo usermod -a -G docker freeradius
 9- sudo systemctl enable docker.service
10- sudo systemctl enable containerd.service
11- sudo wget -O /home/userName/FreeRADIUS_Agent.zip "https://softwareLocation/"
12- sudo unzip /home/userName/FreeRADIUS_Agent.zip -d /home/userName/
13- sudo cp  /home/SO/FreeRADIUS_Agent/Installers/*.sh /home/userName/
14- sudo rm /home/userName/FreeRADIUS_Agent.zip
15- sudo docker load --input /home/userName/FreeRADIUS/Installers/fragent-version.tar
Using an ARM template
The following is an example that extends the use of the cloud-init file shown in the previous section by referencing it from inside an ARM template using the customData capability. As the naming implies, this example is only applicable to use with Microsoft Azure.
In the below example, a CentOS host is installed from Azure Marketplace and configured with Docker and a set up supporting parameters like basic firewall rules to permit RADIUS traffic as well as resource tags. To improve speed of deployment the required software and other artifacts like the cloud-init.txt file is hosted from Azure Container (blob) storage and accessed using a SAS token.
Note
Step by step usage of ARM templates is currently out of scope for this documentation, but the video in the previous section provides some insight.
Warning
This ARM template is provided as an example only and should not be used in a production system without extensive review and testing.
Sample Azure Resource Manager Template:
  1{
  2 "$schema": "https://schema.management.azure.com/schemas/2019-04-01/deploymentTemplate.json#",
  3 "contentVersion": "1.0.0.0",
  4 "parameters": {
  5     "vmName": {
  6         "type": "string",
  7         "defaultValue": "FreeRADIUS",
  8         "metadata": {
  9             "description": "The name of you Virtual Machine."
 10         }
 11     },
 12     "adminUsername": {
 13         "type": "string",
 14         "defaultValue": "",
 15         "metadata": {
 16             "description": "Username for the Virtual Machine."
 17         }
 18     },
 19     "authenticationType": {
 20         "type": "string",
 21         "defaultValue": "password",
 22         "allowedValues": [
 23             "sshPublicKey",
 24             "password"
 25         ],
 26         "metadata": {
 27             "description": "Type of authentication to use on the Virtual Machine. SSH key is recommended."
 28         }
 29     },
 30     "adminPasswordOrKey": {
 31         "type": "securestring",
 32         "metadata": {
 33             "description": "SSH Key or password for the Virtual Machine. SSH key is recommended."
 34         }
 35     },
 36     "virtualMachineSize": {
 37         "type": "string",
 38         "defaultValue": "Standard_DS1_v2",
 39         "metadata": {
 40             "description": "VM size for the host running FreeRADIUS."
 41         }
 42     },
 43     "location": {
 44         "type": "string",
 45         "defaultValue": "[resourceGroup().location]",
 46         "metadata": {
 47             "description": "Location for all resources."
 48         }
 49     },
 50     "resourceTags": {
 51         "type": "object",
 52         "defaultValue": {
 53             "Product": "SAS-PCE",
 54             "Component": "FreeRADIUS"
 55         }
 56     }
 57 },
 58 "variables": {
 59     "nicName": "myVMNicD",
 60     "addressPrefix": "10.0.0.0/16",
 61     "subnetName": "Subnet",
 62     "subnetPrefix": "10.0.0.0/24",
 63     "diskStorageType": "Standard_LRS",
 64     "publicIPAddressName": "myPublicIPD",
 65     "publicIPAddressType": "Dynamic",
 66     "virtualNetworkName": "MyVNETD",
 67     "subnetRef": "[resourceId('Microsoft.Network/virtualNetworks/subnets', variables('virtualNetworkName'), variables('subnetName'))]",
 68     "linuxConfiguration": {
 69         "disablePasswordAuthentication": true,
 70         "ssh": {
 71             "publicKeys": [
 72                 {
 73                     "path": "[concat('/home/', parameters('adminUsername'), '/.ssh/authorized_keys')]",
 74                     "keyData": "[parameters('adminPasswordOrKey')]"
 75                 }
 76             ]
 77         }
 78     },
 79     "networkSecurityGroupName": "default-NSG"
 80 },
 81 "resources": [
 82     {
 83         "apiVersion": "2015-05-01-preview",
 84         "type": "Microsoft.Network/publicIPAddresses",
 85         "name": "[variables('publicIPAddressName')]",
 86         "location": "[parameters('location')]",
 87         "tags": "[parameters('resourceTags')]",
 88         "properties": {
 89             "publicIPAllocationMethod": "[variables('publicIPAddressType')]"
 90         }
 91     },
 92     {
 93         "comments": "Default Network Security Group for template",
 94         "type": "Microsoft.Network/networkSecurityGroups",
 95         "apiVersion": "2020-05-01",
 96         "name": "[variables('networkSecurityGroupName')]",
 97         "location": "[parameters('location')]",
 98         "tags": "[parameters('resourceTags')]",
 99         "properties": {
100             "securityRules": [
101                 {
102                     "name": "default-allow-22",
103                     "properties": {
104                         "priority": 1001,
105                         "access": "Allow",
106                         "direction": "Inbound",
107                         "destinationPortRange": "22",
108                         "protocol": "Tcp",
109                         "sourceAddressPrefix": "*",
110                         "sourcePortRange": "*",
111                         "destinationAddressPrefix": "*"
112                     }
113                 },
114                 {
115                     "name": "default-allow-1812",
116                     "properties": {
117                         "priority": 1002,
118                         "access": "Allow",
119                         "direction": "Inbound",
120                         "destinationPortRange": "1812",
121                         "protocol": "Udp",
122                         "sourceAddressPrefix": "*",
123                         "sourcePortRange": "*",
124                         "destinationAddressPrefix": "*"
125                     }
126                 }
127             ]
128         }
129     },
130     {
131         "apiVersion": "2020-05-01",
132         "type": "Microsoft.Network/virtualNetworks",
133         "name": "[variables('virtualNetworkName')]",
134         "location": "[parameters('location')]",
135         "tags": "[parameters('resourceTags')]",
136         "dependsOn": [
137             "[resourceId('Microsoft.Network/networkSecurityGroups', variables('networkSecurityGroupName'))]"
138         ],
139         "properties": {
140             "addressSpace": {
141                 "addressPrefixes": [
142                     "[variables('addressPrefix')]"
143                 ]
144             },
145             "subnets": [
146                 {
147                     "name": "[variables('subnetName')]",
148                     "properties": {
149                         "addressPrefix": "[variables('subnetPrefix')]",
150                         "networkSecurityGroup": {
151                             "id": "[resourceId('Microsoft.Network/networkSecurityGroups', variables('networkSecurityGroupName'))]"
152                         }
153                     }
154                 }
155             ]
156         }
157     },
158     {
159         "apiVersion": "2020-05-01",
160         "type": "Microsoft.Network/networkInterfaces",
161         "name": "[variables('nicName')]",
162         "location": "[parameters('location')]",
163         "tags": "[parameters('resourceTags')]",
164         "dependsOn": [
165             "[resourceId('Microsoft.Network/publicIPAddresses/', variables('publicIPAddressName'))]",
166             "[resourceId('Microsoft.Network/virtualNetworks/', variables('virtualNetworkName'))]"
167         ],
168         "properties": {
169             "ipConfigurations": [
170                 {
171                     "name": "ipconfig1",
172                     "properties": {
173                         "privateIPAllocationMethod": "Dynamic",
174                         "publicIPAddress": {
175                             "id": "[resourceId('Microsoft.Network/publicIPAddresses',variables('publicIPAddressName'))]"
176                         },
177                         "subnet": {
178                             "id": "[variables('subnetRef')]"
179                         }
180                     }
181                 }
182             ]
183         }
184     },
185     {
186         "apiVersion": "2019-07-01",
187         "type": "Microsoft.Compute/virtualMachines",
188         "name": "[parameters('vmName')]",
189         "location": "[parameters('location')]",
190         "tags": "[parameters('resourceTags')]",
191         "dependsOn": [
192             "[resourceId('Microsoft.Network/networkInterfaces/', variables('nicName'))]"
193         ],
194         "properties": {
195             "hardwareProfile": {
196                 "vmSize": "[parameters('virtualMachineSize')]"
197             },
198             "osProfile": {
199                 "computerName": "[parameters('vmName')]",
200                 "adminUsername": "[parameters('adminUsername')]",
201                 "adminPassword": "[parameters('adminPasswordOrKey')]",
202                 "linuxConfiguration": "[if(equals(parameters('authenticationType'), 'password'), json('null'), variables('linuxConfiguration'))]",
203                 "customData": "[base64(concat('#include\nhttps://pubswedemo.blob.core.windows.net/freeradius/cloud-init.txt?sp=r&st=2021-03-16T09:17:28Z&se=2021-03-16T17:17:28Z&spr=https&sv=2020-02-10&sr=c&sig=eXJCTNEA5vK4TRTVoNJQOu19n9h%2BZSocEMBzx4CfL9Y%3D'))]"
204             },
205             "storageProfile": {
206                 "imageReference": {
207                     "publisher": "OpenLogic",
208                     "offer": "CentOS",
209                     "sku": "7.7",
210                     "version": "latest"
211                 },
212                 "osDisk": {
213                     "name": "[concat(parameters('vmName'),'_OSDisk')]",
214                     "caching": "ReadWrite",
215                     "createOption": "FromImage",
216                     "managedDisk": {
217                         "storageAccountType": "[variables('diskStorageType')]"
218                     }
219                 }
220             },
221             "networkProfile": {
222                 "networkInterfaces": [
223                     {
224                         "id": "[resourceId('Microsoft.Network/networkInterfaces',variables('nicName'))]"
225                     }
226                 ]
227             }
228         }
229     }
230 ]
231}
Testing the Solution
Testing or validating the solution can be done with a test tool or an actual NAS.
A simple end-to-end test involves sending a credential set, typically a username and an OTP and getting a response: either an access-accept meaning the authentication was successful or an access-reject meaning (most likely) the password was incorrect and authentication therefore unsuccessful.
The most basic test plan might look as follows:
TC # |
Test steps |
Expected result |
Actual result |
|---|---|---|---|
TC 1 |
Send valid OTP |
access-accept |
|
TC 2 |
Send invalid OTP |
access-reject |
|
TC 3 |
Disable service |
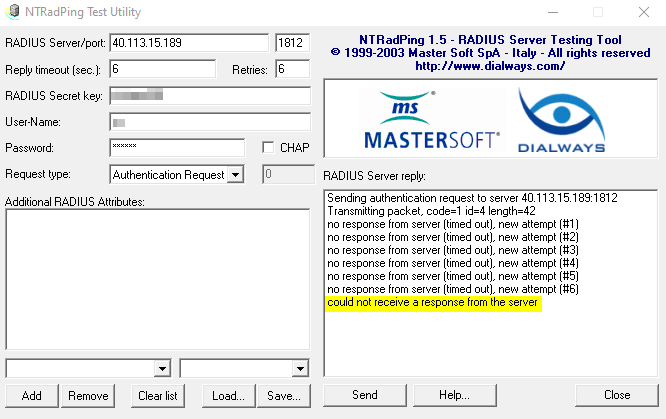
no response / access-reject |
Attention
The latest SafeNet FreeRADIUS agent implements a do_not_respond policy to allow for customer controlled failover. Earlier versions of the agent may respond with Access-Reject when service is unavailable.
Generally available test tools includes radclient and NTRadPing.
Radclient is a RADIUS client program included as part of FreeRADIUS and is bundled with the SafeNet FreeRADIUS agent. It can send arbitrary RADIUS packets to the RADIUS server and show the response(s) and has the benefit of being able to facilitate load testing by specifying requests per second etcetera. To learn how to use radclient please refer to the FreeRADIUS wiki
Example radclient request (from FreeRADIUS wiki):
echo "User-Name = test" | /usr/local/bin/radclient localhost:1812 auth s3cr3t
echo "User-Name=test,User-Password=mypass,Framed-Protocol=PPP " | /usr/local/bin/radclient localhost:1812 auth s3cr3t
echo "Message-Authenticator = 0x00" | /usr/local/bin/radclient localhost:1812 auth s3cr3t
NTRadPing, while more limited in capabilities than radclient, does offer the advantage of running on Windows and being more portable and easier to use. For that reason, testing with NTRadPing is described in detail in the following sections.
Testing with NTRadPing
Installation
To get started with the NTRadPing test tool, click here to download it.
Once downloaded, unpack the tool and then double-click on NTRADPING.EXE to run it.
Configuration
Configuring NTRadPing is generally self-explanatory. As such the following table captures the key configuration parameters. All other parameters can be assumed optional. Note that for your convenience settings are persisted when closing the app.
Property |
Explanation |
|---|---|
RADIUS Server |
FreeRADIUS host IP/FQDN |
Port |
1812 |
RADIUS Secret key |
Shared secret (see clients file) |
User-Name |
SAS/STA username |
Password |
OTP |
Request type |
Authentication Request |
Example requests and responses

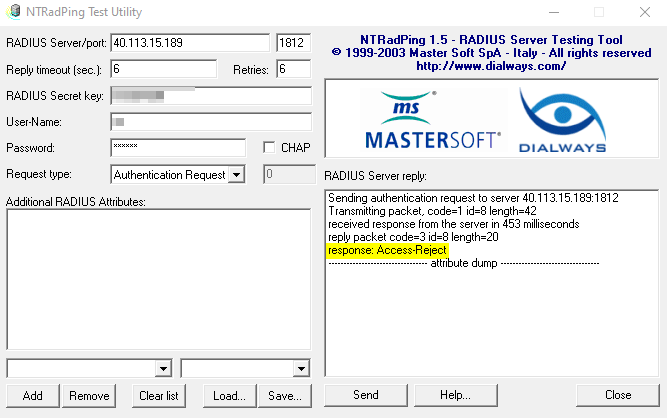
Attention
The latest SafeNet FreeRADIUS agent implements a configurable do_not_respond policy to allow for customer controlled fail-over. Depending on configuration the agent may respond with Access-Reject when service is unavailable.
How to test using OTP (TOTP/HOTP)
To test with an authenticator programmed in either TOTP or HOTP, e.g. MobilePASS+ or OTP 110:
Note
Refer to Configuration section above for base configuration!
Generate an OTP using your SafeNet authenticator
Enter the OTP into the Password field
Click Send to submit the request
How to test using Push OTP
To test with an authenticator that supports Push Authentication, e.g. MobilePASS+:
Note
Refer to Configuration section above for base configuration!
Enter any character on the Password field
Click Send to submit the request
Accept the Push notification on your mobile device
How to test using Challenge-Response
To test with an authenticator programmed in challenge-response mode, e.g. SMS:
Note
Refer to Configuration section above for base configuration!
Enter any character on the Password field in order to trigger the
Access-Challenge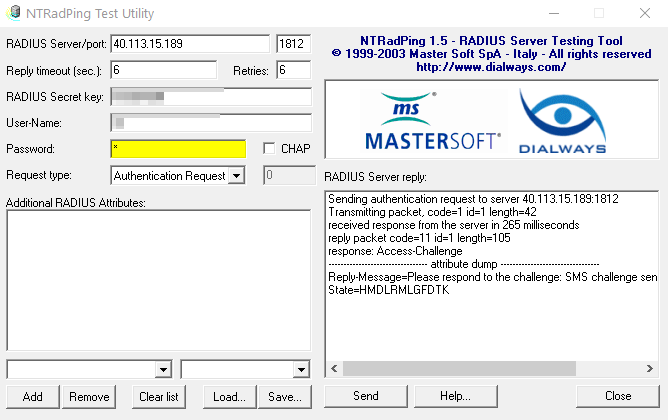
In the drop-down in the lower right corner, select State
In the field next to aforementioned drop-down, carefully enter the state value as shown in the access-challenge
Update the Password field with the response (typically as received over SMS)

Click Send to submit the request
Load testing
Multiple tools exist for load or stress testing a RADIUS server although public availability of such tools is increasingly scarce. GUI based tools supporting Windows includes Dee’s RADIUS Client and Evolynx RADIUS Load Test.
Both these tools (shown below) can be configured to run a set number of requests per second as well as use multiple threads. Important to note is that said tools works with fixed passwords only and as such may not generate the same computation effort on the authentication server as would the use of One Time Passwords (OTP’s).
To perform more realistic load testing One Time Passwords should be used. For Thales internal purposes, in Operations and Engineering, additional test tools exist that can generate OTP from the MP-1 software authenticator. This is expected to be equivalent to using MobilePASS+ in terms of server-side computation effort. While MP-1 is deprecated, customers with an existing license capacity may be able to build a test tool leveraging MP-1 SDK and a command line test tool such as radclient.
Warning
Do not under any circumstances run load/stress testing against any Thales cloud or partner service hosting such as SafeNet Trusted Access. Thales performs testing on behalf of its customers. If you want to load test the FreeRADIUS agent then it must be done in isolation from SafeNet Trusted Access.


Upgrading
The SafeNet FreeRADIUS configuration script is used for upgrading any current installation, regardless of version. That is: the procedure for upgrading is the same, but the actions performed by the process differs according to detected version.
For instance, when upgrading from version 2.x installed RPMs packages of the FreeRADIUS Agent and FreeRADIUS Updater are removed whereas performing the upgrade on version 3.x stops, renames and finally removes the existing Docker container image.
Warning
Upgrading the SafeNet FreeRADIUS agent does not maintain current configuration. Therefore always make sure you document all settings, including the RADIUS client table prior to performing the upgrade.
To upgrade the SafeNet FreeRADIUS agent:
Open a terminal to the FreeRADIUS agent host
Document all current settings and clients
Run the
FreeRADIUSv3.shby executing the following commandsudo sh ./FreeRADIUSv3.sh
Follow further instructions found here