FortiGate VPN and FortiClient with SafeNet Trusted Access using SAML 2.0
Overview
This guide shows how to implement adaptive authentication with strong contextual security policies to FortiGate SSL VPN and the FortiClient using SAML federation with SafeNet Trusted Access
Prerequisites
FortiOS 6.4.4.1803 and above
FortiClient 6.4.2.1580 and above
A user with a SafeNet Trusted Access authenticator enrolled
Users can authenticate using SafeNet Trusted Access
Warning
In evaluating this solution, it is advised to use a FortiGate firewall reserved exclusively for testing. Nevertheless, with limited resources, it’s possible to create an SSL VPN portal on a dedicated port. Please review this document carefully, involve your FortiGate subject matter experts early in the cycle and as always proceed with caution.
Configuration Overview
The configuration requires the following steps:
In SafeNet Trusted Access
In FortGate
SafeNet Trusted Access Configuration
Create FortiGate Application in SafeNet Trusted Access
Note
Open SafeNet Trusted Access Console (you can use the following direct links based on your availability zone, opens in a new tab)
US Zone SafeNet Trusted Access Console
EU Zone SafeNet Trusted Access Console
Classic Zone SafeNet Trusted Access Console
In the STA Console, add FortiGate application by following these steps:
In Applications tab, click on the + button and search for Generic Template

Name the application and choose SAML for the Integration Protocol

Optional - Change the Application Logo by clicking on the default icon. You can download FortiGate logo icon
here
Clcik Add to add the FortiGate Application
Switch to Manual Configuration

Download STA Tenant Certificate by clicking Download X.509 certificate

Note both STA Tenant Issuer/Entity ID and STA Single Sign-On Service URL

Click Next Step
Switch to Manual Configuration

Under Account Details provide the required details using the following values (replace URL:PORT with your own values depending on your FortGate SSL VPN configuration and port)
Important
FortiGate Logout uses Redirect Binding, leave Logout URL (Post Binding) empty
Setting |
Value |
Entity ID |
https://URL:PORT/remote/saml/metadata/
|
Logout URL (Post Binding) |
Empty
|
Logout URL (Redirect Binding) |
https://URL:PORT/remote/saml/logout/
|
Assertion Consumer Service URL |
https://URL:PORT/remote/saml/login
|

Under User Login ID Mapping, select SAS User ID

Under Return Attributes, create an attribute by clicking Add Atrribute with Return Attribute username and User Attribute SAS User ID

Under User Portal Settings, change the Federation Mode to SP Initiated and enter the URL of your FortiGate SSL VPN portal and port number using the colon
:delimiter in Service Login URL
Important
For SSO to work correctly when using the STA User Portal (IDP Initiated SSO) the URL in Service Login URL has to be in the following format: https://URL:PORT/remote/saml/start?realm=

Under Advanced Settings, change the Name ID Format to Unspecified

Under Advanced Settings, set the following settings:
Skip request signature validation
Assertion not encrypted
Sign assertion and response
Enforce Post Binding
Back logout channel

Click Save Configuration
Assign the FortiGate application to your target users by clicking on Assign and selecting All Users or Users from any of these user groups:

Click Save Configuration
Configure STA Authentication Policy
In the STA Console, create a new Access Policy for FortiGate application by following these steps:
Go to the Policies tab
Click + to add a new Policy
Name the new Policy, for example FortiGate VPN
Polcy Scope
Under Users, click All Users to apply to all users or Any of these User Groups: to apply to specifc User Groups
Under Applications, click Any of these Applications, click in the field and select FortiGate application
Default Requirements
Select the desired authentication method for example Password and Every access attempt and Token Based Authentication (OTP) and Every access attempt
Click Save to save the new Policy

The SafeNet Trusted Access configuration of the FortiGate application is complete
FortiGate Configuration
Complete these steps on your FortiGate firewall in order to set SafeNet Trusted Access as the Identity Provider
Add a SAML Identity Provider to FortiGate
Upload your STA Tenant Certificate obtained from past step 5 as a remote certificate:
Note
In the “Import” menu, slect Remote Certificate. Click Upload and select the STA Tenant certificate downloaded here

Important
After import, note the Name of the imported remote certificate. This value will be required in the next step. Example: REMOTE_Cert_1
Note
Next steps are CLI Only, connect to your firewall using SSH
Create the SafeNet SAML IdP with the values noted in this step (replace URL:PORT with your own values depending on your FortGate SSL VPN configuration and port)
config user saml
edit "safenet-sslvpn"
set entity-id "https://URL:PORT/remote/saml/metadata/"
set single-sign-on-url "https://URL:PORT/remote/saml/login/"
set single-logout-url "https://URL:PORT/remote/saml/logout/"
set idp-entity-id "<STA Tenant Issuer/Entity ID>"
set idp-single-sign-on-url "<STA Single Sign-On Service>"
set idp-single-logout-url "<STA Single Sign-On Service>"
set idp-cert "REMOTE_Cert_1"
set user-name "username"
next
end
Note
The following steps can be completed in the FortiGate management console (in this guide we use CLI). These settings will require adjustments. Consult with your FortiGate team as required
Create a user group and set the member with the above saml user (“safenet-sslvpn”)
config user group
edit "saml_safenet"
set member "safenet-sslvpn"
next
end
Complete the SSL VPN configuration to match your current environment
SSL-VPN Settings
config vpn ssl settings
 set servercert "Fortinet_Factory"
 set tunnel-ip-pools "SSLVPN_TUNNEL_ADDR1"
 set tunnel-ipv6-pools "SSLVPN_TUNNEL_IPv6_ADDR1"
 set port 10443
 set source-interface "inside"
 set source-address "all"
 set source-address6 "all"
 set default-portal "full-access"
 config authentication-rule
     edit 1
         set groups "saml_safenet"
         set portal "full-access"
     next
 end
end
Firewall Policy
config firewall policy
 edit 101
     set name "SAML_SSLVPN"
     set srcintf "ssl.root"
     set dstintf "inside"
     set srcaddr "all"
     set dstaddr "corpnet"
     set action accept
     set schedule "always"
     set service "ALL"
     set groups "saml_safenet"
     set nat enable
 next
end
Increase Login Timeout
config system global
 set remoteauthtimeout 120
end
FortiClient VPN Configuration
Launch the FortiClient (version 6.4.2 or above) on the client machine
Add a new connection
Enter a Connection Name and Description
Enter your SSL VPN URL in Remote Gateway
If required - Select Customize Port and enter your custom port
Select Enable Single Sign On (SSO) for VPN Tunnel
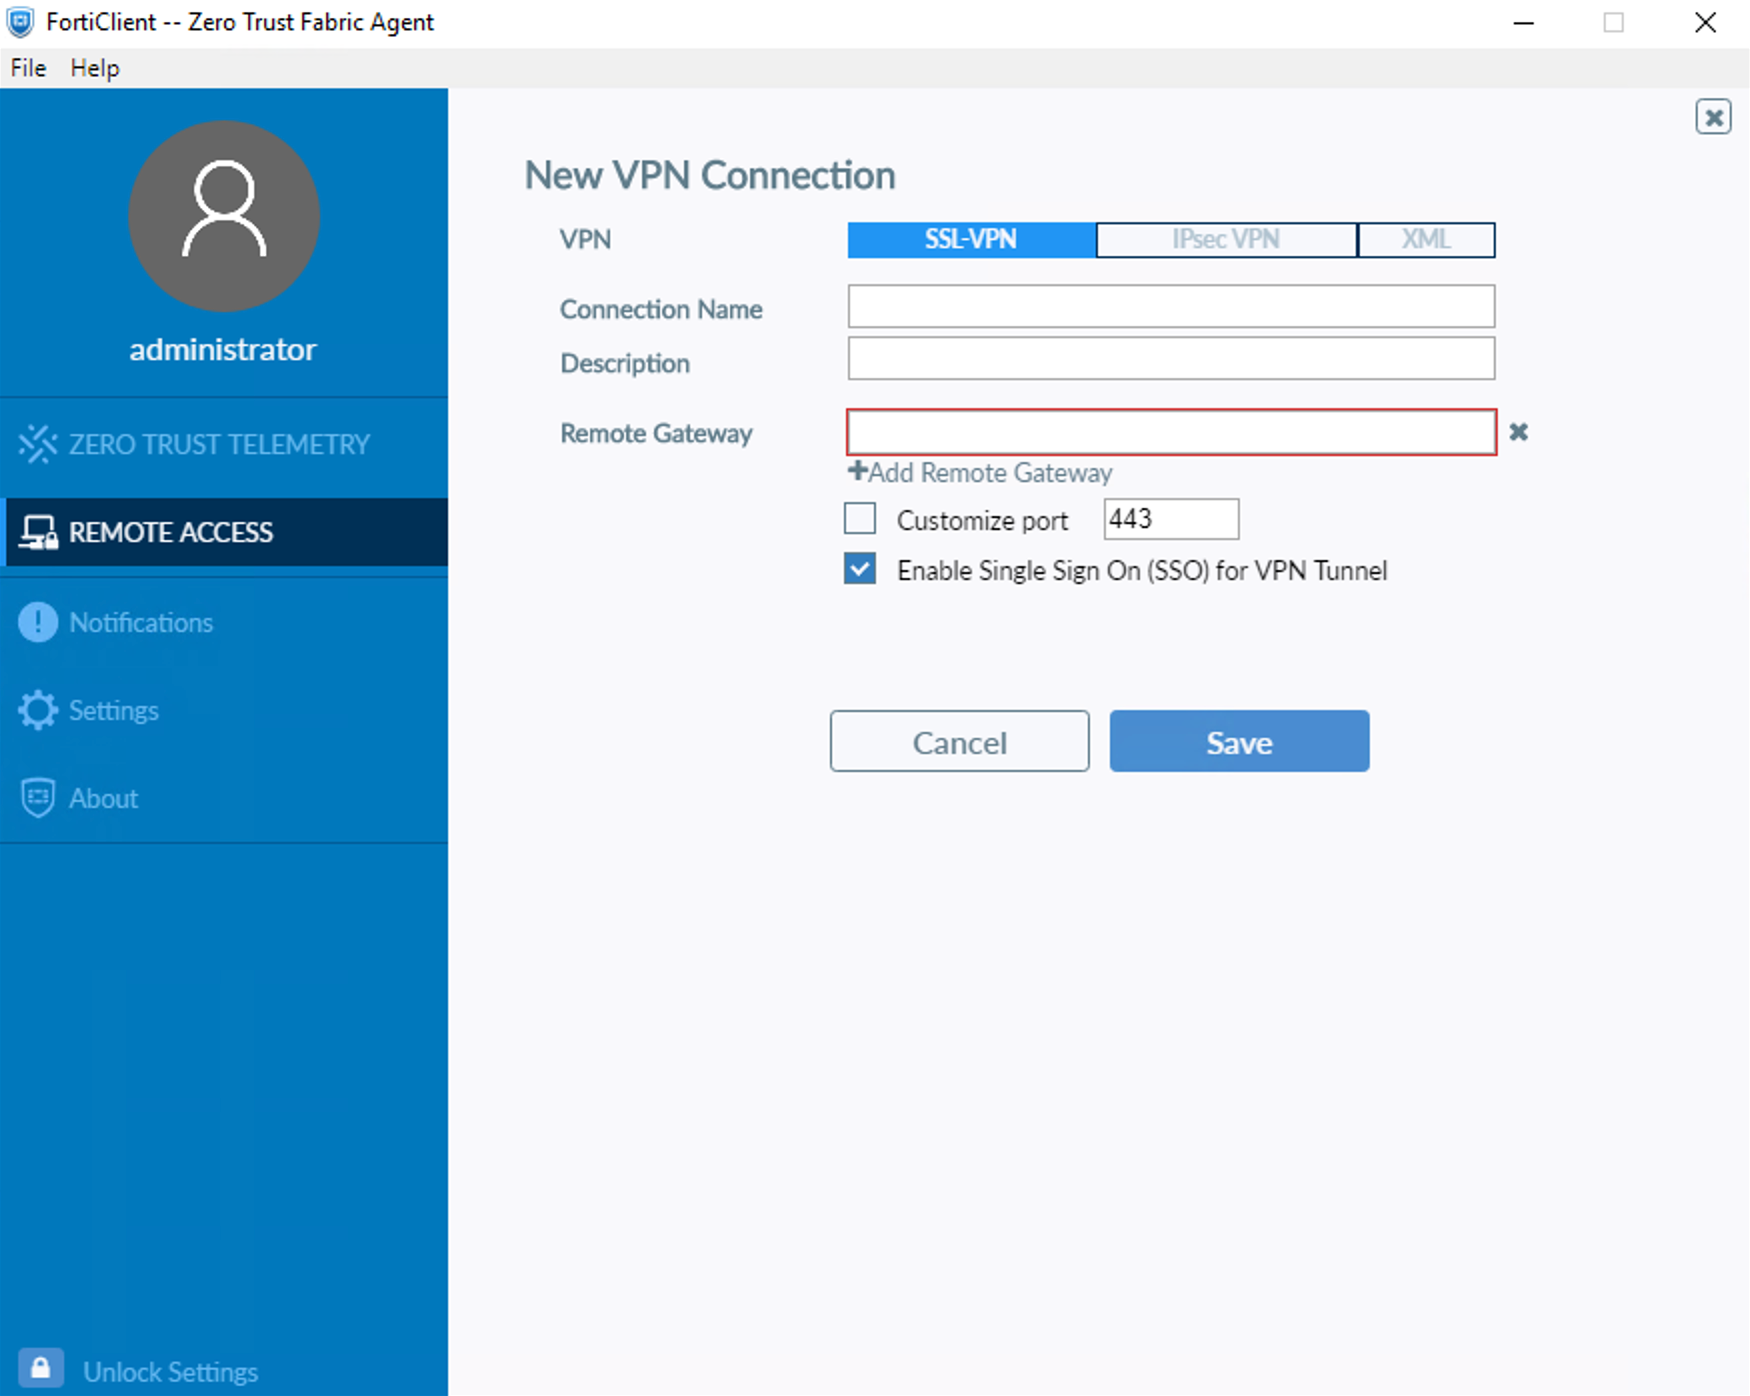
Click Save
The FortiClient configuration is complete
Test the solution
Using FortiClient
Launch the FortiClient on the client machine
In the Remote Access pane, select the VPN connection created in the previous step
Click on SAML Login to initiate the connection

Using SafeNet Trusted Access User Portal
Navigate and login to the SafeNet Trusted Access User Portal
Click on the FortiGate Application
You are redirected and logged in to the FortiGate SSL VPN Web Portal
